General
About
Contacts are people or organisations and may be customers or suppliers. Each Contact can be stored as a separate file or in a Contact Group. The "Contact List" collects Contact files and displays them as a single list (See chapter "Contact List Window").
Separate files have several advantages. One of which is to be able to take some Contact files on a portable computer out in the field, edit them and replace them back in the office once finished. Sales staff can also swap customers amongst themselves by simply swapping files.
In order for these files to appear unique on the disk, they are renamed automatically
when the Contact company name is changed and saved.
Contact groups can also be used to store Contacts. These groups can contain
many Contacts and also be used to classify Contacts, such as a "Supplier"
group and a "Customer" group.
If you have many contacts (more than 500) then Contact groups are recommended
for Contact storage.
In the Macintosh version of SaleSmartz, each Contact is aware of its file’s
folder and label colour. The Windows version also has label colours in SaleSmartz,
but disk file colours are not available on a Windows system.
Contacts can also be classified in your own way by using the variables mode.
Contact files can be shared across a network allowing multiple user access to
the same file (See chapter "Multi Users").
Menu
When the Contact file window is selected its menu will appear.
Contact file menu
Show Person/Address
This allows you to display one of the people (addresses) within the contact file.
Set as default
This will set the currently viewed person, as the default for the contact file.
Set as delivery
This will set the currently viewed address as the delivery address for quotes and invoices.
Don't link eMails
This setting will prevent eMails from being linked to this contact automatically.
Copy person and address
When you select the icon of the person in the contact window (above the first name field), this item will allow tou to copy the whol person and address, and then paste it again, or in another contact.
New Person/Address
This creates a new empty person and address.
Clone Person/Address
This creates a copy of the currently viewed person and address
Delete Person/Address
This deletes the currently viewed Person and Address
Copy all details
This menu item copies the name, address and phone numbers of a Contact person in the address mode, to the clipboard.
Copy merge field names
The mail merge field names can be copied to the clipboard by selecting this menu item. These fields can then be used to create mail merge templates by pasting them into a document in a word processor application (See chapter "Mail Merging").
Move contact to...
This action will move a contact to another contact group.
Delete whole contact
This will delete this contact from the file.
Post code after town/state
The position of the post code in an address can vary for different countries.
If you have Contacts in countries where the post code position is different,
then you can change the position for this Contact by selecting this menu item.
Select it once to change, and again to change back. The position of the town
(state) and post code fields in the address mode will change accordingly.
The default post code position is set in the preferences (See section "Contact", chapter "Preferences").
Has "State"
If a contact has addresses that include a State, this menu item should be checked. This adds a state field to the address fields. If you have purchased SaleSmartz in a country that has states then this option will automatically be marked on for all new contacts.
File label
The file label (colour) can be changed by selecting a colour from the "File label" menu. On a Macintosh, each contact’s disk file can be given a label colour. This colour is shown for each contact in the contact list and in the contact file’s icon on disk.
Creating
Select "New" from the "File" menu and then choose the Contact document type. Alternatively select "New Contact" in the "Edit" menu, from the "Contact List" window.
Deleting
Deleting a Contact involves deleting its file on disk or from its Contact Group. A Contact can also be deleted from the Contact List, by selecting a Contact and then selecting "Clear Contact" in the "Edit" menu.
Opening
Contact file windows can be opened by double clicking on a Contact file or
alternately from the Contact List by selecting a Contact, and selecting "Open
contact" in the "Edit" menu. The Contact window consists of four
different data display modes. Each of these is represented by an icon on the
left of the window. Clicking on the icon will show the appropriate mode.
Quotes/Invoices/Products and To Do Memos can also be dragged onto a Contact
in the Contact list window to open this Contact.
To Do Memo Hot Links can also open a Contact file when double clicked (See section "Hot Links", chapter "Time Manager (Calendar)").
View options
The contact window can be viewed in several ways depending on the size of your
computer screen. To change the view settings, open the "Preferences"
from the "Windows" menu and select the "Contact" preferences
(see section "Contact", chapter "Preferences").
You can view all contact details at the same time, or only view sections at
a time by clicking on the icons in the left of the contact window.
Contact window, using the “show profile/history in address mode” preferences
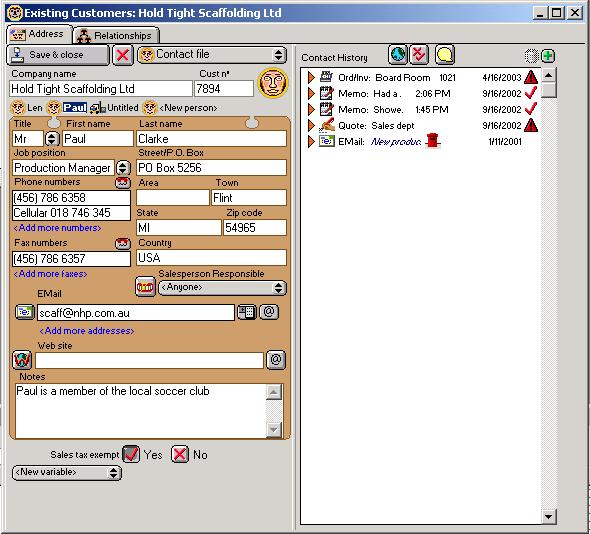
Address
About
General information about a Contact is shown and edited in the address mode.
More than one person or address type (e.g. postal, street or visiting address)
can be added to a single Contact file.
One of these people or addresses can be marked as the default. This default
address will be shown in the Contact List window in the columns containing address
details. The currently shown address can be selected with the popup menu to
the right of the Person last name field. This popup can also be used to add
or remove Person/Address types. There must however be at least one Person/Address
type for each Contact file.
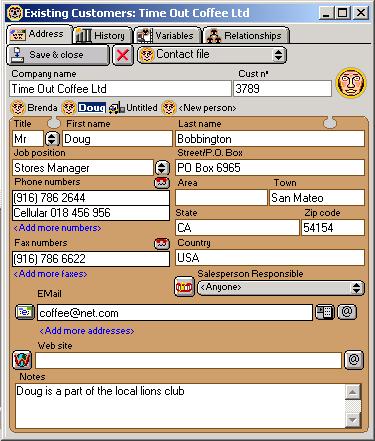
Contact address mode
Save and close
Save changes and close the window.
X - close
Close the window without saving.
Contact file - menu
Menu containg the Contact address mode actions.
Company Name
This is the name of a Contact's company or organisation. It is used as the Contact's file name, so must be included.
Cust no
May be used as a unique reference for the Contact, e.g. customer code or account number. This number is used as a reference when importing contacts to check if a imported contact already exists.
Contact Icon
This icon can be used to drag a reference to this Contact. Contacts may be dragged on to To Do Memos to create Hot Links to the Contact (See section "Hot Links", chapter "Time Manager (Calendar)"). They can also be dragged into Product Info windows to link suppliers to a Product.
Person/Address selector
Underneath the Company name field, there is a list of the addresses included in the contact window. You can choose to show each of these people/addresses by clicking on each of the names.
Title
The title of the person, e.g. Mr., Mrs. or Miss.
Person first name/Person last name
The name of your Contact people at the company or a type of address.
Job Position
The job title or position of the selected contact person.
Phone numbers/Fax numbers
Contact phone and facsimile number(s). These fields will accept both number
and characters. These may consist of 1 or more numbers each.
The button to the top right of each of the phone and fax fields allows you to
quickly ring the numbers in these fields (See section "Dialling" in chapter "Basics").
Address
The address field format is flexible, if you wish to ignore fields in the address then just leave them empty.
Street/P.O. Box
The first line of the address for the selected Contact person.
Area
The second line of the contact address, if used.
Post Code
The postal or zip code for the address. The placement of the postal code is
determined in the preferences. You can choose to have it before or after the
Town field.
Note: SaleSmartz automatically fills empty town and/or state fields while you
type into the post code field. The text for the town/state fields is taken from
other contacts with the same post code or from a database if you have an appropriate
"Plug-in" file.
Town
The town, city or district for the address can be entered in this field.
State
If the contact’s address contains State then this field can be used. Select the menu item "Has State" in the "Contact file" menu to show/hide this field. If you purchased SaleSmartz in a country that has states, the State field will be automatically shown for all new contacts.
Country
This field can be used if you have multi national contacts.
Salesperson Responsible
The name of the salesperson that is responsible for this Contact may be entered here if there are a team of salespeople. This will appear on the printed Quote or Invoice if required and also on reminder To Do memos about Quotes or Invoices.
The EMail address(es) for this person or company can be included in this field. You can add more addresses by clicking on the "Add more addresses" link. Clicking on the button to the left of this field will create a new eMail message to this address. For the 2 buttons on the right, the first will add this email address to the list of shortcut addresses in the eMail window, beside each address. The 2nd button is the "Own domain name" button which will specify that the domain name in this eMail belongs to this contact so all eMails from this domain will be linked to the contact.
Website
The website for this person or company can be included in this field. Clicking on the button to the left of this field will open the website in your broswer. The button to the right of this field is the "Own domain name" button which will specify that the domain name in this website belongs to this contact so all eMails from this domain will be linked to the contact.
Notes
Your comments and reminders for the selected Contact person. This field is hidden when not using "Full access" level.
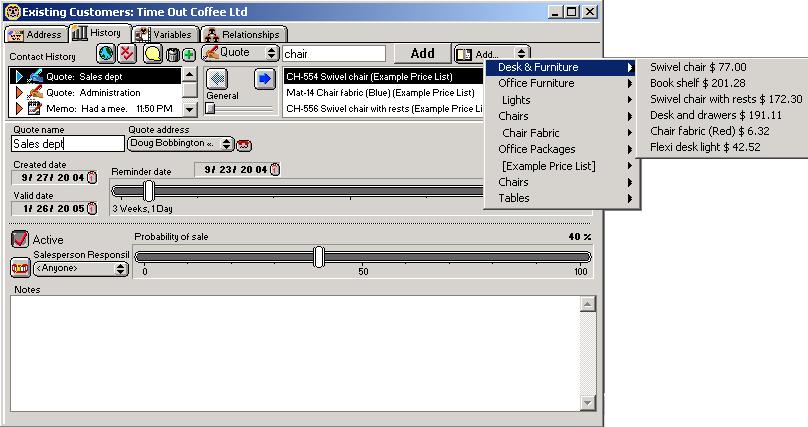
History
About
The Contact history mode displays a list of correspondence and events for each Contact. Each entry in the history mode is sorted in descending order of importance and time.
Contact history mode
When no history entries are selected, the history mode appears as a large list of entries. The entries consist of Quotes, Invoices, Memos, EMails and Documents.
Filtering is provided by the filter button ![]() above the list. This will show the Filter window.
above the list. This will show the Filter window.
Contact history filter dialog
Five buttons to the left of the list provide a filtering function for the display.
Each button represents a type of history entry.
Clicking one or more of these buttons on will include that type in the history
list. Clicking on the "All" button ![]() at the top of the list will show all types at the same time.
at the top of the list will show all types at the same time.
Each history entry has its own editing panel. This panel is shown and the size
of the history list is reduced when you select the entry you wish to work with.
Quote
If you sell goods to a Contact, you can show them your Products and prices
using the Quote function. Quotes for customers are created and edited in the
history mode. Later they can be converted into Invoices. To Do Memos are automatically
created as reminders in the To Do List for each Quote which has been created.
These To Do Memos will appear on the due date of the Quote to remind you to
ring a Contact regarding this Quote.
Summary information about each Quote is shown in the Contact history field.
The due date is shown to the right. If the due date is overdue then a warning
symbol will appear beside the date.
Invoice
An invoicing facility is provided for each Contact. Invoices can only be created
by converting Quotes using the "Convert to Order/Invoice" menu item.
Reminders are included in the To Do List for Invoices that have not been paid
or sent to a Contact.
An Invoice shown in the history list will appear with its name, invoice number,
and the status to the right of the line. The status will be either:
a) Whether or not it has been sent to a Contact.
b) The Payment due/made date. A warning icon will show if an Invoice is overdue.
Memo/Sheet
Reminders and a history of communication with the Contact can be kept in the
Memos section. These can also be used as a call history. Memos that have not
been marked as "Done" have reminder To Do Memos automatically recorded
in the To Do List.
A Memo can also take the form of a call sheet by clicking on the "Call
sheet" button in the Memo editing panel. The Call sheet will then show
the word "Sheet" at the beginning of its line in the history field.
A Memo entry in the history list will display the first line of text in the
Memo. It will then display the due/completed date and a status icon.
A tick will be shown when it has been done, a phone will appear when it has
not been done and a warning icon will be shown when a Memo is overdue.
EMails can be stored in the contact history. These can be optionally linked
to contacts when you send or receive an eMail with this contacts eMail address
in it. This optional linking is set in the Preferences (See section "EMail", chapter "Preferences").
EMails can also be stored with a contact if you send a template eMail to the
contact
Doc
Files can be linked to contacts, these can include letters, faxes, maps, brochures or any other file found on a disk.
Creating entries
New Quotes, Memos and Document links are created by choosing from the "New
object" menu item in the edit menu.
They can also created by selecting "New object" in the "Edit"
menu. A dialogue will appear.
New Quote/Memo/Document link object dialogue
Once created, a new history entry will appear as an untitled item and select
the correct editing panel for that item.
Invoices are created by converting a Quote to an Invoice using the menu item
"Convert to Invoice". A dialogue will appear requesting an order number.
After typing a number to confirm the order the new Invoice will be created and
selected. An option to keep the old Quote once converted is provided in the
preferences.
History objects can be dragged between Contact file windows to create new entries
in other Contact files.
History entries can be duplicated by selecting "Duplicate" in the
"Edit" menu.
Deleting entries
History entries are deleted by selecting the entry in the history list and then selecting the "Clear object" menu item or pressing the "Delete" key.
Editing entries
Click on a history entry to edit it. When selected, a panel will appear to edit that entry. A different panel will appear for each type of entry.
Quote panel
Quotes are editing using this panel in the Contact history mode. When a Quote
is selected in the history mode, this panel will appear to show the Quote's
information.
See chapter "Quote" for details on
editing and printing Quotes.
Quote editing panel
Invoice panel
Once an Invoice is selected, this panel will be shown with its details.
For more information on editing and printing an Invoice, see chapter "Invoice-Order".
Invoice editing panel
EMail panel
The EMail editing panel shows selected eMails. For more information on this editor, see Chapter "EMail".
EMail editing panel
Memo panel
Reminders and a history of communication with the Contact can be kept in the Memos section. Memos are different from To Do Memos, but a To Do Memo reminder will be created automatically for a Contact Memo if it has not been marked as "Done".
Memo editing panel
Done
If the Memo has been completed the "Done" button can be set. This changes the status of the Memo from a reminder to a record of communication.
Call Sheet
Clicking this option on will change the memo into a "Call sheet". A call sheet allows you to define an objective and a result for a sales call.
Memo icon
The Memo icon acts as a dragging object for a memo. Drag this icon to move a reference to this Memo to another window.
Completed
These date and time fields indicate the date of the memo, either the due date for memos not yet done, or the date when contact was made.
Created date
This indicates when the memo was created. This field is optional and set by preferences (See section "Contact", Chapter "Preferences").
Optional indicators: These options areavailable when the preference is set (See section "Contact", Chapter "Preferences").
Incoming/outgoing
The speach and ear icons indicate if this was an incoming or outgoing call.
Chargeable
This button indicates if the memo relates to a call that is chargeable to your client. This can be used later in reports for billing.
Hours/minutes
These fields record the duration of a call.
Concerning
This popup menu allows you to relate a memo to a person in the contact file.
Dial button
This button allows you to quickly dial the number of the selected person.
Salesperson responsible
This field allows you to allocate or record the memo for another person in your company.
Memo content
This field shows the text content of the Memo.
Docs panel
Documents of various types can be linked to the Contact such as faxes, maps and letters. Merged letters can also be automatically linked to contacts.
Contact Docs panel
Variables
About
The variables mode of a Contact contains the classifications you use to describe
your Contacts in more detail.
You can use these classifications in reports or to simply show more information
about each Contact. An example of this is to have variables called "Customer"
and "Supplier" which can be used to class Contacts into groups.
These classifications or properties are created in the default Shared resources
Document (See chapter "Custom Variables").
When you place a link to a Contact property into the Contact profile mode, the
variables code is used as a reference to the original variables in the properties
document. Any changes to properties in this document will be reflected in the
Contact variables.
Warnings will appear to notify you if properties used in this Contact's variables
mode have been deleted or changed from the variables document. You should then
check to be sure the linked variables are still valid (See chapter "Custom Variables").
Contact variables mode
Creating variables (classifications)
As mentioned before, profile properties are created in the Custom variables
window. These properties can be linked to a Contact to create classifications
in several ways.
To add a variables to the list, choose from the "New variable" popup
menu.
New variables can also be dragged from a Custom variables document. Select "Show
Custom variables" in the "Windows" menu. Drag a variable from
this window to add it into the variables mode of a Contact.
You can also click to select the "Variable" field and select "New
variable" in the "Edit" menu. A dialogue will appear allowing
you to select the desired property and add it. The variables shown in the dialogue
are listed from the application's default Shared Resources Document.
Deleting variables
Property links are deleted from the Contact profile mode by selecting the property name and selecting "Clear property" in the "Edit" menu or pressing the "Delete" key.
Relationships
About
The relationships panel displays relationships between different contacts and companies.
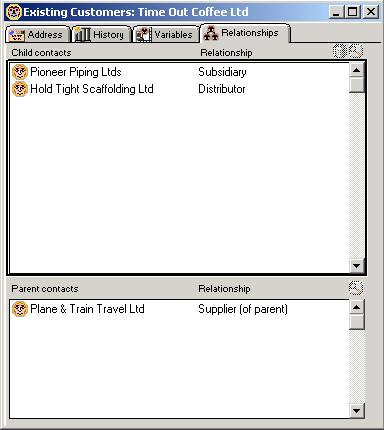
Contact relationships mode
Child contacts
This list displays all contact files that have a child relationship with this contact/company. You can drag contacts from the contact list or other areas to this list. Click on the relationship column of the contact to rename the relationship.
Parent contacts
This list displays all contact files that have this contact as a child relationship.
Multi-user
About
Contact files can be used in multi-user system by placing its file on a shared disk accessible to those who wish to use it (See chapter "Multi Users").