General
About
SaleSmartz provides eMail integration so that you can send and receive eMails, and keep track of customer eMails. EMails can be automatically linked to contacts so that you can see your communication with a contact, at a glance, in the contact history. SaleSmartz uses its own eMail plugins, or external eMail applications to send and receive mail.
You can also use templates to send eMails to one or more contacts. Quotes and invoices can also be emailed to contacts using SZ Templates. (For more information on these, See chapter "SZ Template")
Hints
EMail templates
You can save an eMail as a template by selecting the "File" menu - "Save as" option. Save it into your "Merge templates" folder to use
it as a merge template for contact merges.
You can also add default cc/bcc email addresses and even attachment files or embedded images.
EMail quote/invoice templates
Create a new SZ template and edit the template text. Then copy the template text and paste into an eMail. Save the eMail as a file in your "Templates" folder and it will appear in your quote/invoices template menu.
Private eMail accounts
You can set up personal eMail accounts in the Preferences - eMail accounts, and mark the option "Private account". All incoming and sent eMails for this account will appear in the "Private" folder which no other user can see. (See Section "EMail accounts", chapter "Preferences")
Auto address completion
Type a few letters of someones name or eMail address, click out of the address field and SaleSmartz will search for a matching address. It will insert the found address, or ask you to choose from a list of matching addresses when you click the send button
Out of office reply
Create an out of office eMail template, then you can set up an eMail rule to reply to all eMails with the template when you are on vacation. (See Section "EMail rules", chapter "Preferences")
Creating
New eMail is created by selecting "New" from the "File" menu, clicking on the new eMail button in the Tool Bar or a Contact Info window, or by mail merging with an eMail template
New eMail window
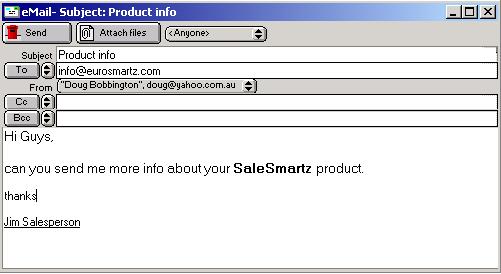
Basic new EMail window
The eMail window allows you to create and edit eMails and then send them to your contacts.
Send
This button will send (or queue) eMails after you have completed them. You can save your eMails at any time and they will appear in the "Drafts" folder in the Mail Centre, until they are sent. If you have chosen the preference not to send immediately, this button will have the text "Queue" on it (See section "EMail", chapter "Preferences"). Clicking on "Queue" will save the eMail in the Mail Centre Outbox until the "Send & Receive" action is processed.
Attach files
With this button, you can attach one or more files to an eMail, so that they are sent with the mail. The list of attached files will appear in the bottom of the eMail window.
Subject
This field is used to enter the subject of the eMail
To/Cc/Bcc
These buttons/fields can be used to enter the address of the recipients. The
arrow icons to the right of these buttons allow you to choose an address from
your shortlist. This shortlist can be the most commonly used eMail addresses
and is changed by clicking on the button ![]() to the right of the eMail field in a contact window.
to the right of the eMail field in a contact window.
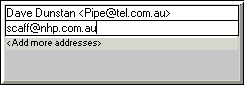
EMail destination address field
When you edit an address, the address editor window will appear over the eMail window. Several addresses can be added to an eMail, by clicking on the "Add more addresses" link, or by pasting from the clipboard.
Note: You can type names of contacts or partial addresses and SaleSmartz will find matches and automatically fill in the address.
From
The "From" popup menu allows you to choose the "From" address for your eMail. The list of these addresses is stored in the preferences (See Section "EMail accounts", chapter "Preferences")
Message
The large field in the bottom of the eMail window is used to enter the text
of the message. You can have a default signature appear here by default by setting
the eMail accounts in the preferences (See Section "EMail accounts", chapter "Preferences")
Use the Font and Style menus at the top of your screen to format the text message.
Spell checker
You can use the built in spell checker for your emails. Windows users may need to install some extra software.
Click here for more info.
Spell checking is automatic and any text that may be a spelling error will be hilighted in red.
Right click on any text that is in error and you will be shown a menu of options to
correct the text.
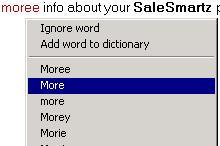
Spell checker menu
Incoming eMail
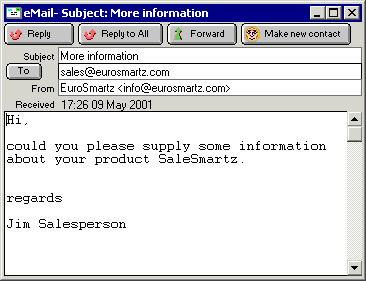
Received eMail window
When you receive an eMail, it will have additional buttons in the eMail window.
Reply
This button will copy the text of the message and create a new eMail to the sender. Each line of the copied message can have a prefix (e.g. > ) so that you can see the original text. This prefix is set in the preferences (See section "EMail", chapter "Preferences")
If you have set several eMail accounts in the preferences, the reply message will automatically have your "From" address set to the matching eMail account, and also any signtaure will be attached below the message.
Reply to all
this button functions in a similar way to the "Reply" button, but includes the addresses of all recipients in the new eMail.
Forward
This button will create a new eMail with the contents of the received mail, to allow you te send it to another recipient.
Make new contact
If the received eMail is not linked to a contact (i.e. the sender's address is not stored for any contact in your contact list), you can make a new contact from this eMail, by clicking on the "Make new contact" button. The address and any other name information stored in the eMail will be used to create the new contact.
Once you save the new contact, all eMails relating to this contact will be attached to the contact if you have the preference set to do so (See section "EMail", chapter "Preferences")
EMail menu
The eMail menu will appear in the top of your screen when you have an eMail selected or an email window open.
EMail Menu
Send
Send or queue this eMail, depending on your preference settings (See section "EMail", chapter "Preferences")
Queue
Queue this eMail in the Outbox for the next "Send & receive"
Reply
Create a new email in reply to this eMail
Reply to All
Create a new email in reply to this eMail, but to all addresses listed in the eMail
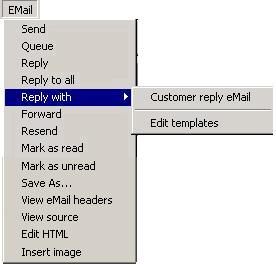
Reply with <template>
Create a new email in reply to this eMail using the selected template. See section "EMail templates", chapter "EMail"
Forward
Forward the email and any attachments to one or more eMail recipients.
Resend
Forward the email and any attachments in its original format, to one or more eMail recipients. This can be useful if you want to forward emails with HTML content to somone.
Mark as read
Change the "read" status of this email for you, to "Read" without opening it. This won't affect the read status for other users.
Mark as unread
Change the "read" status of this email for you, to "Unread". This won't affect the read status for other users.
Save as..
Saves the current eMail as a file. This is useful for converting incoming eMails into templates.
View eMail headers
Show the hidden transmission information for an eMail.
View source
Show the content of the eMail message. This is really only useful for HTML messages.
Edit HTML
If you choose to resend an HTML formatted email, this menu item will allow you to edit the raw HTML before sending it.
Insert image
This will allow you to select an image file and then attach it to the eMail and insert an image tag placeholder in the email text.
This placeholder text will then be replaced with the image when the eMail is sent with the SaleSmartz eMail Plugin.
EMail templates
About
EMail templates can be used as standard replies to emails, or even to email quotes and invoices.
Correspondence eMail templates are stored in the "Merge templates" folder and can be edited using the "File" menu - "Merge with" - "Edit merge templates".
Quote and invoice eMail templates are stored in the "Templates" folder inside your SaleSmartz folder.
New eMail templates can be saved by using the "File" menu - "Save as" menu item when you have an email open.
To create more advanced eMail templates, paste the text from an "SZ Template" (Chapter "SZ Template") This will allow you to merge contact and quote/invoice fields with your template.
Mail Centre
About
The Mail Centre stores and organises all eMails. It has several folders which store different types of eMail.
Opening
The Mail Centre window can be opened by choose "Show Mail Centre" from the "Windows" menu. You can also set a preference to open it when starting SaleSmartz (See section "General", chapter "Preferences")
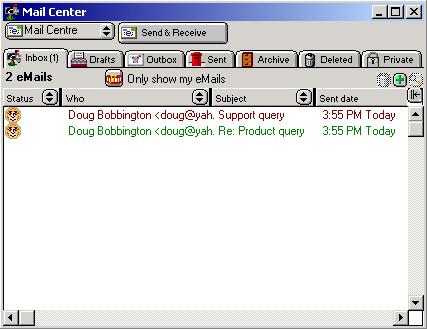
Mail Centre Window
Mail Centre menu
This button shows the menu for the Mail Centre. Details below
Send & Receive
This button will synchronise the Mail Centre with your eMail application. Queued mails in the Outbox will be sent and new mail will be added to the Mail Centre Inbox.
Inbox...Deleted
These folders store different types of eMails. You can move eMails between
folders by selecting and then dragging eMails onto the name of the folder.
The number of unread emails for each folder is displayed in the folder name tab, inside brackets.
Additional eMail folders can be added in the preferences (See section "EMail", chapter "Preferences")
Private
This folder stores your own private eMails so that no others on the network can see or access them.
Reply etc.
Other buttons will appear once you have selected one or more eMails. These are the same buttons that appear in the eMail window and have the same function (See section "EMail")
Only show my eMails
This button will filter eMails so that you will see only those that were sent to or from you, or that don't match any of the user's personal eMail addresses if you have a network system. You will need to make sure you have set your personal eMail address in the preferences for this (See section "Myself", chapter "Preferences").
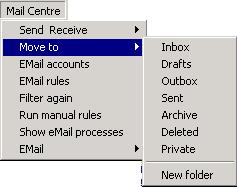
Mail Centre Menu
Send & Receive
You can manually synchronize eMail accounts using this menuitem. EMail accounts are synchronized in the background.
Move to
Use this menuitem to move selected eMails to other folders.
EMail accounts
Edit all eMail accounts in the preferences.
EMail rules
Edit all eMail rules in the preferences.
Filter again
This will filter all eMails in all folders and check to link them to contacts with matching eMail addresses.
Run manual rules
Run any rules marked with the option "Manual".
Show eMail processes
Show any background eMail account plugin processes.
Displays the eMail menu (see above) for selected eMails.
Attachments
Any attachments for incoming eMails will be stored in a folder called "EMail
attachments" on your server, or in your SaleSmartz folder. These attachments
can be set to be removed if you delete the associated eMail, by setting a preference
(See section "EMail" chapter "Preferences").
Private eMail attachments are stored locally on your own computer.
EMail Rules
About
EMail rules are powerful filters which can be used to perform actions on eMails.
For example, you can move all eMails with a particular subject to a special folder.
You could also create a rule to reply to all emails sent to a support email address.
This reply could send and eMail template displaying the status of a support contract by comparing a contact's custom variable with the current date.
(See section "EMail rules" chapter "Preferences")