General
About
The functionality in SaleSmartz can be customised to better suit your requirements
by using these preferences.
To activate the Preferences dialogue, select "Preferences" in the
"Windows" menu. There are different modes for this dialogue. If the
current window is related to a mode then the preferences will show this mode
by default, e.g. opening the preferences while a Contact file window is selected
will switch to "Contact" mode of the dialogue.
Preferences are stored in a file called "SaleSmartz preferences" and
stored in the computer's "Preferences" folder on a Macintosh or in
the SaleSmartz folder on Windows systems.
The following descriptions of each mode in the preferences also show the "default"
settings in each mode.
General mode
The general mode contains settings for the whole application.
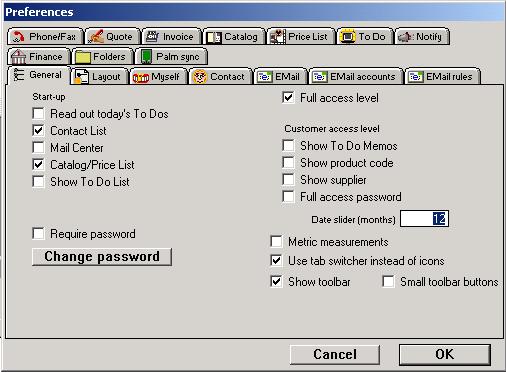
General mode
Start-up
The actions taken when SaleSmartz is launched are listed here.
Read out today's To Dos
This option is only for computers with a supported voice/speech synthesizer. This will read out the To Do memos for the day when you start SaleSmartz.
Contact List
Choosing this option will open the Contact List window every time SaleSmartz is launched.
This option also scans the disk(s) for Contact files and Automatic To Do Memos. Your To Do List will then contain the latest Quote/Invoice and Memo warning memos. This is setting is recommended for a network based system, as other users can change Contact files without updating your own To Do List.Mail Centre
Choosing this option will automatically open your default Mail Centre.
Catalogue/Price List
This option will open the default Catalogue or Price List window if you have set one.
Full access level
Without this option the user level at start-up will be the Customer level, with the appropriate restrictions (See Access level in chapter 5. "Basics").
Require password/Change password
If you choose this option, access to SaleSmartz and your data will be denied at start-up until you type in a password, for added security.
Note: When SaleSmartz is first installed, your password will be empty. If you are asked for your password before you have changed it, simply leave the password field empty.
Click on "Change password" to enter a new password. You will be asked to enter the old password followed by the new one and then a confirmation of the new password. There is no password installed in SaleSmartz after you install it so leave the "Old password" field empty.
Customer access level
The customer access level is used when you wish to show a customer your Product Catalogue in SaleSmartz. Information viewing is restricted in this level. The options here can determine which additional features are disabled.
Show To Do Memos
Warnings for To Do memos can be suspended while the user level is set to Customer level. The content of To Do Memos is also hidden as is are all open To Do Memo windows.
Show Product codes
When the customer user level is chosen (not Full access), Product codes can be hidden if this check box is not selected.
Require password for full access
When you wish to switch back to full access level, you will be asked for a password first. This is to prevent a customer from viewing data while you are not in front of the computer.Show supplier
As with the Product codes, Suppliers can also be hidden from the customers by unchecking this check box.
Metric measurements
Check this option if you wish to use metric units (millimetres etc.), otherwise inches will be used. This preference is used in the Label Template window.
Date slider (months)
Throughout SaleSmartz, dates can be changed with a slider as seen below. The maximum range of this slider can be set by changing this field.

Date slider
Show utilities bar
This option shows the tool bar with shortcut buttons.
Layout mode
The layout mode contains layout settings for the whole application.
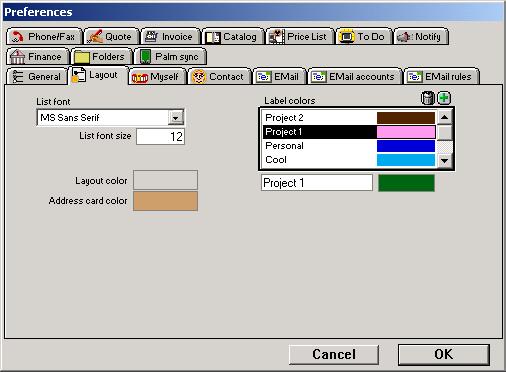
Layout mode
List font, List font size
The default font and size used for most lists is defined in this popup and field.
Layout color
This is the color that gets used for most windows.
Address card color
This is the color that is used to display contact address cards.
Label colors
You can specify category names and colors for contacts and eMails here.
Myself
The information describing the user of the Application is stored here.

Myself mode
This information is used in Quotes and Invoices when printing and is selected
from a Print Template (See chapter "Print Template").
Each of these fields is free text and can be filled with information that you
need.
My Code
The code field can contain a reference for the customer, such as tax or salesperson number.
Sales Commission
The sales commission figure defines the revenue you gain as a salesperson. This figure is used in the "Profit mode" of Quotes and Invoices to indicate the revenue on these items. A figure of "0" will mean that this value is ignored.
Contact
The Contact mode shows the settings for Contacts and mail merging.
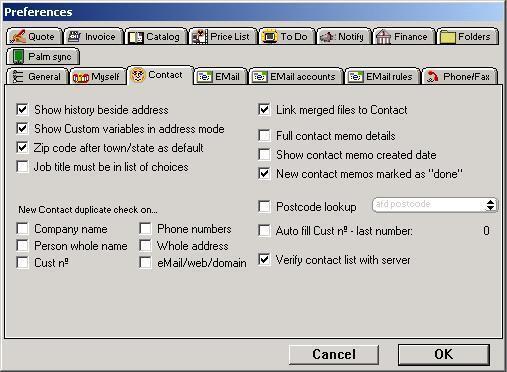
Contact mode
Show history beside address
This option will display the contact history for a contact beside the address details in the address mode, so that you don’t have to click on the "History" mode icon in the left of the window to view contact history.
Show Custom variables in address mode
This option will display contact properties for a contact in the first (address) mode of a contact window, so that you don’t have to click on the "Profile" mode icon in the left of the window to view properties.
Post code after town/state as default
The post code in a Contact's address can be placed either before or after the town/state. This is useful for international Contacts. The position of the post code for new and imported Contacts can be set here. Once a Contact is opened, an individual preference can be set in the "Contact file" menu.
The post code field is not required for a Contact's address.
Job title must be in list of choices
This option relates to the job title field of a contact window. With this option "on", the text must be in the list, or be added to the list.
New Contact duplicate check on...
These options will check all new contacts to see if any of these fields match existing contacts. This avoids duplicattion in your database.
Link merged files to Contact
After the new merged file has been saved it can be automatically linked to the "Docs" section of the Contact, by checking this button.
Full contact memo details
This option displays more options when viewing a contact memo, such as memo type, incoming, outgoing etc.
Show contact memo created date
This option will display a date field for a contact memo to show the date the memo was created.
New contact memos marked as done
This option will set the "Done" button for new contact memos so that they are either reminders or history records, by default.
Postcode lookup
This option is available if you have postcode Plug-in software for doing searches on postcodes ad filling in the address fields accordingly.
Auto fill Cust No
This option will create a new customer number for all new contacts.
Verify contact list with server
Unchecking this option will stop checking the server for contact group file changes. You can use this if you have a very slow network connection
The eMail mode shows the settings for eMails and the Mail Centre.
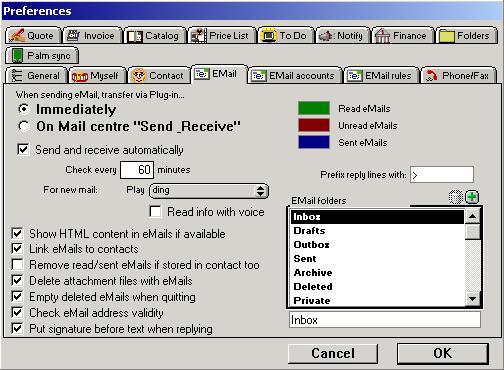
eMail mode
When sending eMail, transfer via plug-in...
This sets the option when to send your eMails to your eMail application. You can queue your mails by choosing On "Mail centre" Send & receive.This will store mails in your Mail Centre "Outbox" until you synchronise with your mail application.
Send and Receive automatically
This option will automatically synchronise your eMails with your external eMail application when you are not using your computer. This ensures your Mail Centre is up to date.
Check every
Enter the minutes delay between each check
For new mail:
You can also choose to notify you if an eMail arrives when you are not using your computer. This can be in two possible ways:
Play
This will play a sound for any new messages
Read info with voice
If you have a compatible voice synthesizer, this option will make SaleSmartz read out the "From" address and the Subject of any new mails.
Show HTML content in eMails if available.
This option will show formatted HTML text in any eMails if they have any, and your computer supports this display.
Link eMails to contacts.
This option will link all incoming and outgoing eMails to any contact that matches the to or from eMail address. This helps to keep track of contact eMails by showing them in the contact history.
Remove read/sent eMails if stored in contact too
This option will remove any eMails that you have read, which have been linked to a contact. This clears out your inbox of read mails as the mails can always be found in the contact hsitory.
Delete attached files with eMails
This option will delete attachments from the "eMail attachments" folder when you delete the associated eMail, removing unlinked files.
Empty deleted eMails when quitting
This option will delete any eMails in the "Trash" folder of the Mail Centre, when the Mail Centre window is closed.
Check eMail address validity
Override the validity check for eMail addresses.
Put signature before text when replying
Determines if the signature for an eMail account will go before or after the reply message.
eMail colours
These colour panels allow you to choose the colours of different eMail types.
Prefix reply with
This field can contain text to place before each line of the original text when you reply to a mail. This allows you to see the differemce in the text content.
EMail folders
Here you can change the name of the eMail folders in the Mail Centre. You can also add new custom name folders.
EMail accounts
The eMail accounts mode shows the accounts used for sending and receiving eMail.
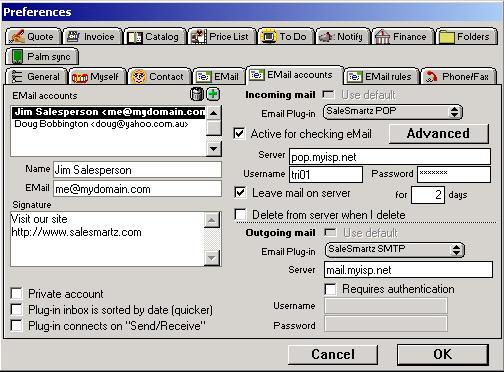
eMail accounts mode
EMail accounts
This field contains a list of all eMail accounts.
These will appear in a popup menu for new eMails so you can set the "From" address of
your mails. Click on an account to edit it, or use the editing buttons in the
top right of this list to add and remove accounts.
Each account may have a different plugin for incoming and outgoing mail, or simply use the default account (shown in bold in the list).
Name
This can store your name or description of the address.
This stores the "From" eMail address.
Signature
This stores any signature text wich you want to place at the bottom of your eMails. This can be your company text or website etc.
Private account
Makes sure sent and received eMails are stored in your own private folder in the Mail Center. Other users can't access this folder.
Mail application Inbox is sorted by date (quicker)
Use this option if your external mail application has it's inbox sorted by date. If it isn't sorted by date, some messages won't be imported if you use this option. If you have this problem, don't use this option.
Plugin connects on "Send & Receive"
Some external plugins may support this option to connect to the mail server when synchronizing.
Incoming mail
These settings are for receiving the eMail for the selected account.
Default
If this is not the default account (first in the list, in bold) then you can check the "Default" option to use the default account plugin options.
EMail plug-in
Select the plugin to use for the incoming eMail for this account, if you don't use the default.
The SaleSmartz POP/IMAP plugins are recommended as they don't require an external application.
For the SaleSmartz plugins:
Server
This field contains the name of your POP/IMAP email server. Check with your ISP.
Username/Password
These fields contain the credentials to log in to your email server. Check with your ISP.
Leave mail on server for ...
Check this option if you want your eMail to remain on the server so other applications can access it.
You can define how long it is kept in the for-days field.Delete from server when I delete
Check this option to remove mail from the server when you delete it from within SaleSmartz. This won't happen until you empty your Deleted folder
Outgoing mail
These settings are for sending eMail for the selected account.
Default
If this is not the default account (first in the list, in bold) then you can check the "Default" option to use the default account plugin options.
EMail plug-in
Select the plugin to use for sending eMail for this account, if you don't use the default.
The SaleSmartz SMTP plugin are recommended as they don't require an external application.
For the SaleSmartz SMTP plugin:
Server
This field contains the name of your smtp email server. Check with your ISP.
Requires authentication.
Check this option if your outgoing server requires a username/password.
Username/Password
These fields contain the credentials to log in to your email server. Check with your ISP.
EMail rules
The eMail rules mode shows the rules used to perform actions on eMails.
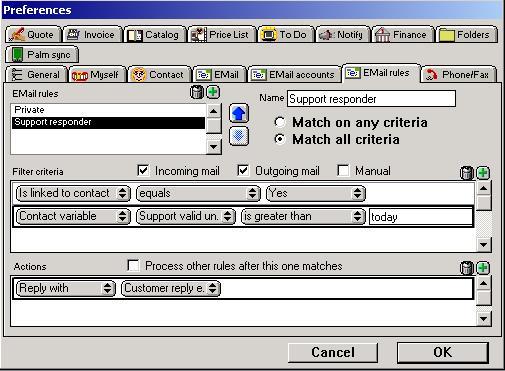
eMail rules mode
EMail rules
This field contains a list of all eMail rules. Add new rules with the add button in the top right of this field.
Move up/down
The two arrows to the right of the rule list will change the order of the rules by moving the selected rule up or down in the list.
Name
Enter your own name for the selected rule
Match on any criteria
This option will make all the criteria "OR" related so any matches will cause the actions to be performed.
Match on all criteria
This option will make all the criteria "AND" related so all criteria must match to cause the actions to be performed.
Incomimg mail
Check this option to apply the selected rule to all incoming mail.
Outgoing mail
Check this option to apply the selected rule to all mail sent.
Manual
Check this option to run the selected rule when the manual rul option is slected from the "Mail Center" menu.
Filter criteria
A list of criteria that filters eMails. Use the add and delete buttons in the top right to edit the list. Use the popup menus to select different criteria.
Process other rules after this one matches
This option will allow other rules to process an eMail after the eMail matches this rule.
Actions
A list of action to perform on matching eMails. Use the add and delete buttons in the top right to edit the list. Use the popup menus to select different actions.
Phone/Fax
The Phone/Fax mode shows the settings for automatic phone dialling and caller display (incoming call recognition).
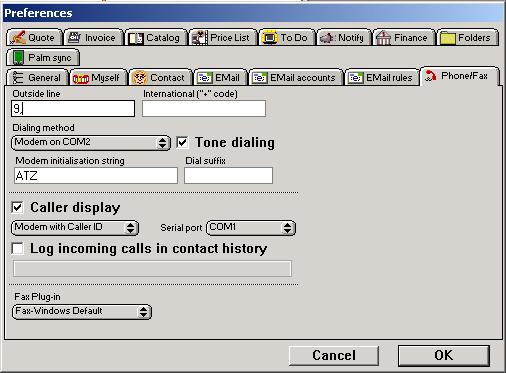
Phone mode
Note: The speaker dialling method may not be available on Windows systems.
Outside line/International ("+" code)
These fields can be used if you require extra prefix codes for phone numbers. When you put a "+" in front of a phone number, the international code will be used as a dialling prefix for the phone number.
Dialling method
You can choose to dial using a modem, if you have one connected, or using the
speaker in your computer. If you use the speaker method then you should hold
the microphone of your phone to the speaker when dialling, you may need to adjust
the volume of the speaker using the popup menu to get better results.
Note: The speaker dialling method only works for phones with tone dialling capability.
If you choose the modem dialling method then you can choose the modem’s port in the "Serial port" popup, and initialisation string.
The "Dial suffix" field is used if you wish to add a modem command to the end of the dial command string.
Caller display
If you have an appropriate caller device connected to your computer, SaleSmartz
can be configured to display an incoming caller’s Contact file window as
the phone rings.
If you have plug-in files for Caller display devices, these plug-ins will appear
in the popup menu to the right of the "Caller display" button allowing
you to choose the settings defined in the plug-in file.
If you wish, the popup menus allow you to configure the serial port that the
caller device is connected to. The prefix and suffix fields define the strings
sent by the device to enclose the phone number.
Log incomng calls in contact history
This option is for caller display and will record all incoming call events in the appropriate contact history.
Fax plugin
You can select the plugin for your fax software if it is installed. This is used for mail merging and quote/invoice template printing.
Quote
The Quote mode shows the settings for Quotes and template printing.
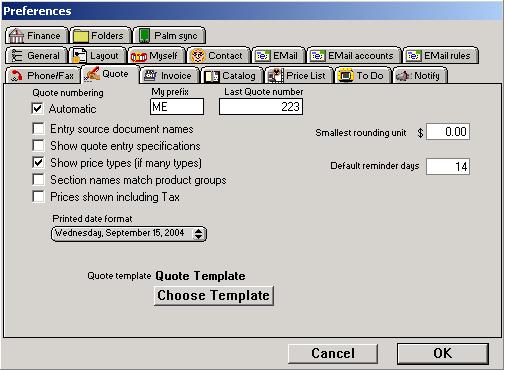
Quote mode
Quote numbering
This option automatically creates quote numbers for new quotes. You can set the prefix and starting point with the fields beside this option.
Entry source document names
This shows the source file (Price List or Catalogue) file name for each quote entry object.
Show quote entry specifications
This option will automatically show specifications for all new quote entries installed into quotes.
Show price types
If you have more than one price type, then this setting will show each quote entry’s price type in the contents mode of Quotes.
Section names match product groups
This option will create a new section to match the name of the product group that new products may have.
Prices shown include Sales tax
This option will show the quote entry prices in the quote, inclusive of sales tax.
Printed date format
When a date field is printed from a Quote or Invoice, its format can be set here. Date fields can be items such as today's date, due date or validity date.
Smallest rounding unit.
If you do not wish to show small currency units in quotes, you can set the rounding value in this field. This field will contain the minimum unit for rounding up or down.
Default reminder days
You can specifiy the default reminder days for new quotes here.
Default Quote template
New Quotes can have a Print template installed as they are created. A template is chosen with the button "Choose template" below the template field.
Invoice
The Invoice mode shows the settings for Invoices and Orders
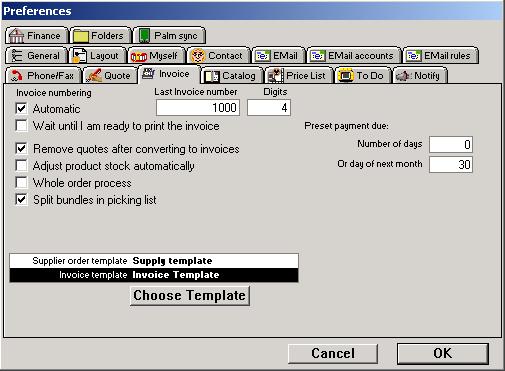
Invoice mode
Invoice numbering
Automatic invoice numbering can be used to reference new invoices as they are
created. Check this option on if you wish to use this feature.
If you are using a network of SaleSmartz applications, be sure that each user
uses the same Shared properties document, stored on a server disk. The last
invoice number is stored in the properties document and is checked to provide
a unique invoice number.
Wait until I am ready to print the invoice
This option will set the invoice number when you print the invoice for the first time instead of when you convert a quote to an invoice.
Remove quotes after converting to Invoices
Quotes can be converted to Invoices. The original Quote can be automatically removed once converted, by checking this button.
Adjust product stock automatically
If you use the product stock option in price lists, this option will adjust stock levels to account for products used in invoices/orders.
Whole order process
If you use more than the invoice document, then you can click this option on so you can print and record other order-related documents.
Templates
Each step of the order process can have a preset template which will be installed when an order/invoice is created. Each template is chosen with the button "Choose template" below the template fields.
Preset payment due
Here you can choose to set the payment due date for new invoices. Choose either the number of days after the invoice was created, or the day of the next month if your payement terms are set this way.
Catalogue
The Catalogue mode shows settings for Catalogues and an option for Quotes.
Catalogue mode
Entry source document names
Catalogue entries will show the file name of its source document (Price List) in its information field.
Include Sales tax in prices
If you check this option, prices shown in a catalogue will include sales tax.
Large format catalogue entries
Catalogues entries can have two different sizes. This check box sets the size to large.
Object width/height
These fields allow you to define the size of large catalogue entries. The units are pixels (screen dots).
Default Catalogue/Price List
This field contains the name of the application's default Catalogue or Price List file if installed. This file is opened when you select "Open Catalogue/Price List" in the "Windows" menu and also when you use the "Add" popup menu in a quote. Click on the button "Choose file" to select a new file.
Auto open source documents
Catalogues and Quotes have source documents which store prices and other information for Products and Bundles. These source files can be automatically opened when a Quote or Catalogue file is opened. To Do this, click on this check box. The Source file will then be opened, but hidden (Visible only in the "Windows" menu).
Price List
The price list mode defines price types and Sales tax.
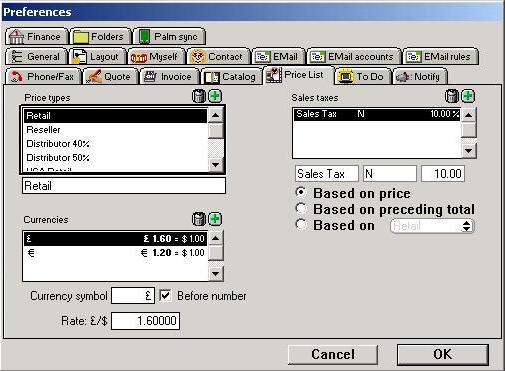
Price List mode
Price types
Price types can be used to define different pricing levels e.g. retail and wholesale. New types can be added by clicking in the price types field and selecting "New price type" in the "Edit" menu. These price types appear in price list and product information windows.
Sales tax
A list of all sales taxes is included in this field. These sales taxes can
be added by clicking in the Sales tax field and selecting "New sales tax"
in the "Edit" menu.
Sales taxes can be based on price types, but are usually based on the price
of products.
Currency
You can set up the currencies you may use, in this list. These can be attached to your cost or sell prices if your products use different currencies from your default.
To Do
The To Do mode sets the preferences for To Do related windows.

To Do mode
To Do List file name
The application's To Do List file name is recorded here.
Message Centre file name
If you have installed a Message Centre, its name is listed here. A new Message Centre can be chosen by clicking on the "Choose Centre" button (See chapter "Time Manager (Calendar)").
Week start day
In the To Do Month window, days of the week are shown. The starting day of each week can be chosen here.
Month memo times
Choosing this option will display the time for each To Do Memo listed in the To Do Month window.
Day Times
The To Do day window has time guidelines in hours. These guidelines can be set here.
Day start time
The To Do Day window starting hour guideline.
Day finish time
The end of the guideline hours.
Day interval (minutes)
The interval (in minutes) between each guideline hour in the To Do Day window.
Default memo time
A To Do memo created by dragging an object into the To Do Month window will have a due date set as the destination day of the month. The default time of that day can be set here. If you turn off the "Time related" button, new memos will have no due time, just the day.
Default memo type
As mentioned above, a memo can be created by dragging objects such as Contacts/Quotes on to one of the To Do windows. These created memos will then have the default type set here.
Default duration (minutes)
You can set the default duration time for all new To Do Memos in this field.
Memo colours
The base colour of the To Do Memo windows can be set here. The Auto Text colour will be used when an Auto To Do memo appears in a list. Click on a colour block to open the colour editing dialogue.
Remote To Do List Colours
When you open a Message Centre or another user's To Do List file, their To Do Memos will appear in different colours. This is to avoid confusion as to where these memos come from.
Notify
The notify mode sets the default actions for To Do Memos that become due. This relates only to the memos that have a due date, i.e. "Date related".
Notify mode
Flashing alert icons
Memos in the To Do List that are overdue will show an alert icon beside the description field in the list window. They will also show the icon in the To Do Memo window. If this check box is checked, these icons will flash to draw your attention to them.
Advance warning time
A time can be set to warn in advance that a To Do reminder will be due. A reminding action, the same as the notification action above will be done.
To Do warning sound
A sound can be played when a To Do Memo is due. The sound (or a no sound option) can be chosen in this popup menu.
Notification action
The action taken to show the warning when the memo is due can be set here.
No warning
Due memos will be ignored. Only an alert icon will show that a memo is due.
Show To Do memo
The memo window will be opened when it becomes due.
Show warning window
A window will appear displaying information about the memo when it is due.
Warn when in another application
When a To Do reminder is due and you have the application running in the background
(i.e. while you are using another application), a warning can be sent to you
to show the reminder is due.
This warning action is in addition to whatever action is taken as set above
No warning
Nothing will be done to warn you about a reminder when you are using another application.
Icon in menu (Macintosh only)
A beep will occur and then a flashing icon will appear in the application menu to the right of the screen.
Show warning window
A window will appear displaying information about the memo when it is due. On a Macintosh, a flashing icon will appear and the beep will also occur.
Finance
The finance preferences mode allows the editing of finance rates used for Quote
and Invoice finance examples. Finance is selected in the Costs mode of a Quote.
If you offer the option for finance you can enter and update the current terms
and rates for finance in these fields.
Finance mode
There are two fields in the finance mode. The top for the list of rental finance rates, and the lower for the purchase finance rates.
Adding rates
To add a finance rate and term, click in the field you wish to use and select "New rate" in the "Edit" menu. A new default rate will appear. Type the term (in months) in the field below the list to the left and its associated percentage rate in the field to the right.
Deleting rates
To remove a rate from either of the rate list fields, select the line you wish to delete and select "Clear rate" in the "Edit" menu or press the "Delete" key.
Editing rates
Rates can later be edited by selecting a line and typing values into the two editing fields below the list.
Folders
The folders mode provides settings for automatic saving of contacts and other files.
Folders mode
PC compatible file names (Macintosh only)
This option will add the 3 letter suffix to file names when you save files for a macintosh. This suffix is needed for PCs to access the files. If you are using a mixed network of Mac and PC then you should select this option.
Save new contacts as
These options allow you to choose the method of saving new Contacts.
Single Contact file
This option saves new contacts as single files on a disk. The "Choose folder" button allows you to choose a folder to be used as the default for saving new Contacts.
In a Contact Group file
This option saves new Contacts in a Contact Group chosen with the "Choose file" button.
Default contact group file
This sets the default group where new contacts will be saved.
Save when closing contact windows, without asking me
This option saves new Contacts when you close the Contact window, without asking to save.
Default merge file folder
This folder can be set to contain all new merge templates so you don’t have to find the folder each time you save a merge file.
Save merged files here without asking me
This option can be used to automatically save all merged files without a "Save file" dialogue.
Default merge document application (Macintosh only)
Word processor merge templates should be saved as "RTF’ format and stored in the "Merge templates" folder inside the application’s folder. If these merge templates have no application type then a default application can be set in these preferences. This application will be launched with the new merged file after it has been saved (See chapter "Mail Merging").
Palm
The palm mode provides settings for synchronizing with Palm devices.
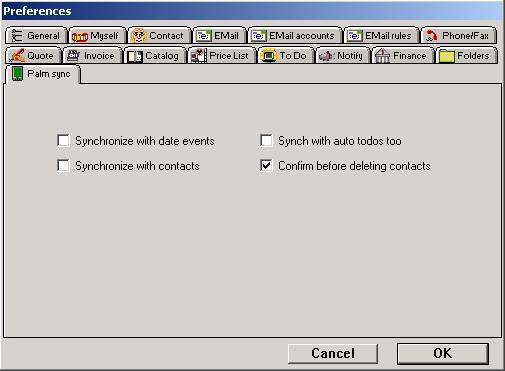
Palm mode
Synchronize with date events
Check this option if you want to synchronize with date/calendar events
Synchronize with auto to dos too
This option includes the automatic (blue) to dos in the syncrhonization
Synchronize with contacts
Check this option if you want to synchronize with contact/addresses
Confirm before deleting contacts
This option will prompt you before a synchronization will delete any contacts in the SaleSmartz database.
Admin (Administrator only)
The admin mode provides settings for multi user privileges.
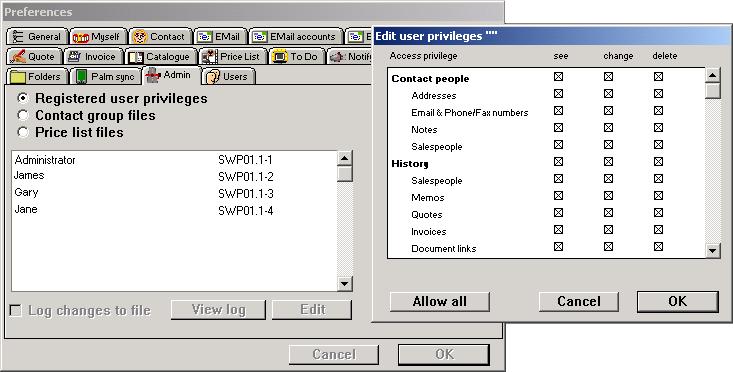
Admin mode
There are three modes for editing privileges:
Registered user privileges
You can define what access certain users have to various areas of the application. Click on the user and the "Edit" to edit their privileges, as shown in the window above.
Contact group files
You can define what users have what type of access to each contact group file.
Price list files
You can define what users have what type of access to each price list file.
Log changes to file
This option will log changes to a log file for future reference.
View log
This button will open a window with a list of saved logs.
Users (Administrator only)
The users mode provides settings for user licences and passwords.
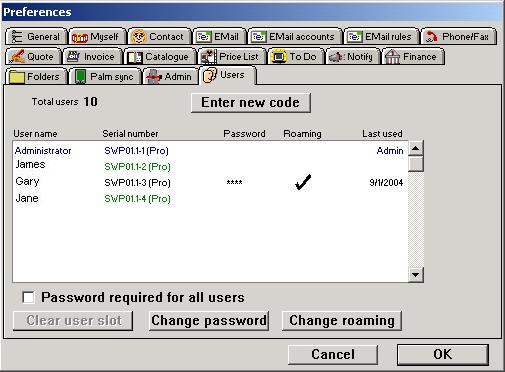
Users mode
Total users
This field contains the total number of users you that your licence covers.
Enter new code
If you have added more users, you can enter the new code supplied by EuroSmartz by clicking on this button.
User list
This list shows all users and their status. The name of the users is set by each user in their own "Myself" preference.
Password required by all users
This option will require all users to set and enter a password at startup.
Clear user slot
This button will clear the user associated with the serial number so you can change the licence to another computer.
Change password
Clicking this button will allow you to set/change a password for a user.
Change roaming
This action will allow a user to log in from another computer and retain their preferences and To Do list.