General
About
The Time Manager section of SaleSmartz has many functions. It is a Contact
manager, day planner, organiser and reminder system. It is designed with simplicity
in mind, but has the support of a very sophisticated system.
The central component of the Time Manager is the To Do Memo. It appears as a
simple window where text can be entered, but can be expanded to include much
more detail if required.
The term "To Do List" is used to describe the Time Manager in SaleSmartz.
The To Do List contains and organises all To Do Memos.
Menu
The Calendar menu is always visible.
Calendar menu
New To Do
Creates a new empty To Do Memo and opens its window. This can be done at any time (when there is no dialogue open) without closing documents.
New banner
A new banner can be created by selecting menu item. See the section on banners later in this chapter.
Read out today's To Dos
If you have a compaitble sound synthesizer installed, this menuitem will read out the dail to dos. This option can also be set at startup (See section "General", chapter "Preferences")
To Do List
Show the To Do List window, the list of all To Do Memos.
Monthly planner
Show a monthly view of To Do Memos.
Weekly planner
Shows the window with the To Dos for a whole week.
Daily planner
Shows the window with the To Dos for a particular day.
Access...
Define the access you will allow for other users connecting remotely to your To Do List. Connecting remotely to your To Do List is only allowed if you place your To Do List on a networked shared disk.
New Message Centre...
Selecting this menu item will create a Message Centre file. A Message Centre is effectively the same as a To Do List file but can be opened separately. This can be placed on a networked shared disk and is used to receive memos from other users, if you turn off or take your computer away from the network (See section "Remote access" below).
Open Message Centre...
Open the application's default Message Centre to view received memos.
Remote access
Additional menus appear for a To Do List if you open a Message Centre or another
user's To Do List. As mentioned before, a Message Centre operates in the same
manner as a To Do List.
When you open a Message Centre or another user's To Do List another To Do menu
will appear. This operates in the same way as the application's To Do menu but
only applies to the opened file.
Creating
The "To Do List" is created if necessary when the application is launched. A file called "To Do List" will appear on disk. This file can then be placed elsewhere if you wish but is always required to run SaleSmartz.
Deleting
The To Do List file can be removed, but will be recreated when SaleSmartz is launched again. Do not remove the To Do List file while the application is running.
Opening
The three To Do view windows can be opened in the "To Do" menu or
the To Do List window can be opened by opening its disk file.
Saving
The "To Do List" file is automatically saved when the application
quits or when one of its view windows is closed. To Do Memo windows are saved
when they are closed.
To Do Memo (manual)
About
The To Do Memo acts as the central component of the To Do List. In its simplest form it appears as in the figure below. There are two forms of memo. One is the manual version as described here and the second is an automatically created by the application (See section "To Do Memo (automatic)" later in this chapter ).
Basic To Do Memo
The colour of the window can be set as a preference (See section "To Do", chapter "Preferences"). The default colour for a manual To Do is yellow.
Creating
The To Do Memo can be created in many ways.
Selecting the "New To Do" menu item will create a simple memo window as in the figure above.
Many objects can be dragged into one of the three To Do windows (List, Month, Week and Day windows) to create a new memo.
Objects such as Contacts from Contact Lists, Products from Catalogues and Price Lists, Quotes/Invoices and Memos from Contact windows can be dragged into the windows to create a new memo. When created, the memo will include an icon of the object being dragged, this is called a Hot link and acts as reference to the source object (See section "Hot Links" later in this chapter).
Deleting
Manual To Do memos are deleted by selecting the memo in any of the three main
windows, selecting "Clear To Do" in the "Edit" menu or pressing
the delete key.
They can also be deleted when a memo’s window is open by clicking the delete
memo button.
This button is visible when you display the information panel at the top of
the To Do Memo window.
Editing
When a memo is first created, its window will appear and immediately allow
text to be typed into it. This text will automatically be saved when you close
the window.
This allows you to quickly open a new memo with the keyboard shortcut -T(Mac)/Ctrl-T(PC),
type a reminder and close the memo, knowing it has been saved. Later when you
have more time can the memo be opened, viewed and changed.
Memo window (Date dependent)
The function of each of these buttons is listed here.
![]() More
More
Show the detailed information dialogue for this memo.
Types.
The following buttons set the type of the memo. Clicking on one or more of these buttons will add this type to the memo.
Phone
A phone call was received or should be made.
Appointment
An appointment to do something.
Meeting
A meeting to be attended.
Quote
This memo relates to a Quote.
Invoice
This memo relates to an Invoice.
![]() Done
Done
A personal reminder whether or not a memo has been actioned.
![]() Send To Do
Send To Do
Click this button to send a To Do Memo to another user across the network.
![]() Dial
Dial
Automatically dial phone numbers (See section "Dialling", chapter "Basics")
![]() Delete memo
Delete memo
Delete this To Do Memo from the To Do List
![]() Warning
Warning
Shown when this memo is overdue
![]() Drag handle
Drag handle
Drag this icon to move this memo's information to another window.
Due date
If "Date dependent" has been checked "on" in the information dialogue, then a "Due date" field will appear to show this date. It can be edited by clicking in the date or time fields and editing them (See section "General", chapter "Basics").
![]() Now
Now
Set the due date of this memo to the current date and time.
Detailed information
Clicking on the "Info" button in a memo window will open the information dialogue.
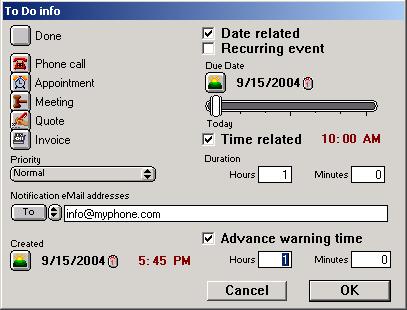
To Do Memo information window
This window allows editing of the data stored in the memo.
Done
As in the memo window, "Done" is a reminder to you that the memo has been actioned or not.
Type
"Type" buttons appear again down the left side of the dialogue. These have the same action as the buttons on the memo window top panel.
Priority
The priority of the memo can be set in this pop up menu. The setting can be one of "<None>", "Normal" or "High". This setting will affect the memos text appearance in the main windows, as a reminder.
Notification eMail addresses
You can enter one or more eMail addresses in this field to have this To Do memo sent to the recipients when it is due, or for advance warnings.
Created
This date can be edited and acts as personal reminder of when the memo was created.
Date related
This option enablesl date and time fields. It means that the To Do Memo has a specific time.
Recurring event
If you have an event that repeats e.g. a birthday or paying monthly wages,
you can choose this event type.
The "Start date" sets the date for the first occurrence of this event
e.g. a birthday would have the birth date, with the year of birth, or simply
last year.
"Every period" defines how often the event occurs e.g. a birthday
would be "Every Year".
"On period number" chooses when the event occurs e.g. a birthday would
have "On day 0" as the "Start date" defines the actual date.
Other events could be monthly wages e.g. "Start date" of last month,
"Every 1 month", "On Tuesday 1", if you wanted to remind
you of wages on the first Tuesday of each month.
Time related
If you can enter a specific time for this memo, use the "Time related" option. Type the time value into the field to the right of this button.
Advance warning time
Each To Do Memo can have an warning to remind you about the memo in advance. This warning can be enabled and the period set with the fields at the bottom right of the dialogue. A default warning will be set for each new To Do Memo according to the setting in the preferences (See section "Notify", chapter "Preferences").
Notification
When a To Do memo becomes due, actions can be taken to warn you. These actions
are set in the preferences (See chapter "Preferences").
An alert icon will appear in the To Do Memo window and in the "Names"
column of the To Do List window.
Other applications
To Do due warnings can also be made to appear in other applications while you are using them.
To Do Memo (automatic)
About
As seen in the Contact window, many items are time dependent. Quotes and Invoices
have due dates, Contact memos also have dates. When a Contact file is opened,
To Do Memos are created for each of these. These To Do memos are automatic and
have a different colour to differentiate them from the normal To Do Memos. The
content of Automatic To Do Memos cannot be changed
A Quote for example has a due date, which becomes the To Do Memo’s due
date. A Hot link is also placed on the To Do Memo window to open the Quote concerned
(See Hot link section later in this chapter).
Creating
Automatic To Do memos are created or updated when a Contact file is opened
or saved.
The "Contact List" also updates these memos when scanning for Contact
files. The latest automatic memos can be read at start-up by setting the "Show
Contact window" Preference (See section "General mode", chapter
24. "Preferences"). This is recommended for a network based system,
as other users can change Contact files without updating your own To Do List.
Deleting
Automatic To Do Memos are managed by the To Do List. These memos will be deleted
when they have are no longer required, e.g. a Quote has been deleted or deactivated.
Automatic To Do memos can also be deleted by selecting the memo in any of the
three main windows, selecting "Clear To Do" in the "Edit"
menu, or pressing the delete key.
Although they have been deleted, they will appear again if the Contact file
they are linked to is opened or saved.
Hot Links
About
A Hot Link is an object which can be placed on to a To Do Memo. It is a link to another part of the application.
Creating
Hot links are created by dragging objects onto a To Do Memo. It can be any one of these.
![]() Contact
Contact
Dragged from a Contact address mode or the Contact List window.
![]() Dial
Dial
Created by the "Telephone" dialogue.
![]() Quote
Quote
Dragged from the history mode in the Contact window.
![]() Invoice
Invoice
Dragged from the history mode in the Contact window.
![]() Memo
Memo
Dragged from the history mode in the Contact window.
![]() EMail
EMail
An email dragged from the Mail Centre or a contact History.
![]() Catalogue
Catalogue
Dragged from a Catalogue window.
![]() Report builder
Report builder
Dragged from Report builder window.
![]() Report
Report
Dragged from a Report window.
A hot link appears as an icon and name (in italic text style) on a To Do memo.

Contact Hot link
It can also be created by dragging a Hot link from another To Do memo.
Another form of Hot Link is provided for Products. This link stores lists of
Products and acts as a very simple calculation area and is called a Quick Quote,
described later in this section.
Deleting
A Hot link is deleted by selecting it, and then selecting "Clear Hot link" in the "Edit" menu, or pressing the "Delete" key.
Opening
A hot link is opened by double clicking on it or selecting, and selecting "Open
Hot link" in the "Edit" menu.
A Contact Hot link will open the Contact file. Quote/Invoice and Memo Hot links
open the Contact file first and then select the original object in the history
mode.
Note: Quick Quotes can not be opened but the Products and Bundles contained
in them can.
Quick Quote
Quick Quotes are lists of Products and Bundles on a To Do Memo. A Quick Quote is created when you drag Products or Bundles from a Price List or Catalogue on to a To Do Memo.
Quick Quote Hot Link
Each line in the Quick Quote lists the quote entry's details. The Icon is taken
from the source object. The quantity is displayed and used in calculations.
The product code is shown if the user level and preferences allow it. The name
of the entry and price are taken from the source Product or Bundle.
If no source document is open, the sell price will not appear for an entry.
The price is not fixed like a normal Quote but linked directly to the source
object.
The Goods total is shown as a sum of all Quote entries in the Quick Quote. This
is also only available when all source Price Lists or Catalogues are open and
each source object can be found in these files.
Dragging a whole Quick Quote is done by clicking in the region outside the
entry list but still inside the outer border.
Quick Quotes can be dragged on to Contacts to create a new Quote. This means
that a Quick Quote can be used as an easy calculation area and then be transferred
to a Contact file for additional options and printing.
A To Do Memo containing a Quick Quote can also be dragged onto a Contact to
create a new Quote. The text in the To Do Memo will be moved to the "Notes"
field of the new Quote.
Adding Entries
Additional Products or Bundles can be installed after the Quick Quote has been created, by dragging them on to the To Do Memo.
Deleting Entries
Quote entries can be deleted from a Quick Quote by selecting the entry in the list, selecting "Clear quote entry" in the "Edit" menu or pressing the "Delete" key.
Editing Entries
Editing Quote entries can be done by choosing an entry and selecting "Open quote entry" in the "Edit" menu or double clicking on a line.
Quick Quote entry info dialogue
Icon
The icon is displayed from the source Product or Bundle object.
Quantity
The quantity value associated with each Quote Entry is changed in this field.
Name
The name of the Quote Entry is taken from the source Product or Bundle.
Product code/Bundle code
The code that links this Quote Entry to the Product or Bundle.
Discount
A discount percentage for the selected quick quote entry can be set in this field.
Price List file name/Catalogue File name
The name of the source document that contains the Product or Bundle
Choose file
Click this button if you wish to change the source document of the selected quote entry, i.e. Price List or Catalogue file.
Open source info
Click this button to open the information window for the source Product or Bundle.
Banner
About
Banners can be used to mark periods of several days with a message or theme, e.g. expos and training courses.
Creating
Banners are created by select "new banner" in the To Do menu. You will then be presented with the banner information dialogue.
Banner information dialogue
Deleting
A banner can be deleted by selecting it in the To Do Month window and pressing the "delete" key or selecting "Clear banner" in the "Edit" menu.
Editing
Changes to banners are made using the banner information dialogue. This dialogue is opened by double clicking on a banner in the To Do Month window, or by selecting a banner and selecting "Edit banner" in the "Edit" menu.
To Do List window
About
The complete list of To Do memos can be viewed in this window.
To Do List window
The top panel contains filters for the memos. If you only wish to see some of the memos, selections in this panel can remove the others.
Time filter
The period of time for the selection of memos can be chosen here. Those memos without a due date can be viewed with the "No due time" menu item.
Priority
The priority can be chosen here to show only those memos that match.
Types
The type of memos viewed can be selected here, by clicking buttons "on" or "off".
All choices
The "All choices" button ![]() shows all To Do Memos stored in the To Do List.
shows all To Do Memos stored in the To Do List.
List
The list of To Do Memos included in this application are listed here. The contents and sorting of the list can be changed with the headings at the top of the list (See section "Display columns", chapter"Basics").
To Do Month window
About
To Do memos can be viewed in periods of single months using the Month window.
To Do Month window
The month being viewed is shown in the top panel. A pop up of months and also arrows allow selection of the month. The year can be changed by typing the desired year in the year field, or clicking on the arrows. The current month can always be shown by clicking on the "Now" button on the top left of the window.
The days of the week are displayed on the top. The starting day of each week
can be changed in the preferences (See section "To Do", chapter "Preferences").
Days before and after the month being viewed are shown in a darker colour.
The memos displayed in the To Do Month window can have times displayed if you wish. This is a preference.
Scheduling
To Do Memos can be moved between days inside the month window by clicking and
dragging them. This changes the due date of each memo as it is shifted. Auto
To Do Memos can not be shifted in this manner.
An item such as a Contact or Quote dragged on to a day in this window will create
a To Do Memo. This new memo will have the due date as the destination day. The
default time of day for this new memo is set from the preferences.
Days
Double clicking on a day in the calendar, or selecting a day and selecting
"Open day" in the "Edit" menu , will open the "To Do
Day window".
Note: When selecting the day, be sure not to click on any of the To Do Memos
in that day. The best way to do this is to click on the day number to select
it.
Weeks
Week numbers are shown to the left of the month. Double clicking on these numbers will open the "To Do Week window".
To Do Week window
About
The To Do Week window acts in a similar way to the Month window.
To Do Week window
The week being viewed is chosen in the top panel. A date can be chosen in the
date field. The week including this date will then be shown.
The button to the left of the window, the "now" button will reset
the selection to show the current week.
Hours of the day are shown as guidelines for scheduling. The start, end, interval
times and week start day can be set as preferences (See section "To Do", chapter "Preferences").
You can double click on a day name to open the To Do Day window.
Scheduling
To Do Memos can be shifted within this window to reschedule them. As they are moved to different times of the day, or different days, the due date of the memo will change to match the time.
To Do Day window
About
The To Do Day window acts in a similar way to the Month window.
To Do Day window
The day being viewed is chosen in the top panel. The date field can be changed
or the arrows can be used to select a different day.
The button to the left of the window, the "now" button will reset
the selection to show today.
Hours of the day are shown as guidelines for scheduling. The start, end and
interval times can be set as preferences (See section "To Do", chapter "Preferences").
Scheduling
To Do Memos can be shifted within this window to reschedule them. As they are
moved to different times of the day, the due date of the memo will change to
match the time.
The duration of each memo can be adjusted by dragging the tab at the bottom
of each to do memo’s rectangle.
Objects such as Contacts and Quotes dragged on to times in this window will
create To Do Memos, with due dates set to the destination time.
Remote access
About
To Do Lists can be accessed by other users across a network. You can allow these users to view information in your To Do List. This feature is useful for example, if several people wish to organise a meeting together.
Access
The access privileges you allow other users for your To Do List file is set in the "Access" dialogue. This dialogue is opened by selecting "Access" in any of the "To Do" menus. You can only edit the access privileges for your own To Do List or Message Centre.
To Do List access dialogue
Use the check boxes to determine what a remote user connecting to your To Do
List can do.
If you do not any access at all for other users then be sure to place your To
Do List file on your own disk and do not share its folder across the network.
When "View memos" is off, other users can only see the time placement
of To Do memos, not the actual content.
When you open another user's To Do List, you can view the access you have by
selecting "Access (R)..." in the "To Do (Remote)" menu.
The access dialogue will appear but you can't edit another user's access privileges.
Opening remote To Do Lists
To open another user's To Do List or Message Centre, select "Open..."
in the "File" menu in the normal manner. Locate the file on the network
and click "Open". Be sure that the other user has placed their To
Do List or Message Centre on a network shared disk.
Note: The other user does not need to close their To Do List file for you to
access it.
Once opened, the remote To Do List file's List window will be shown. The "To
Do (Remote)" menu will appear to help you open other windows.
You can drag To Do Memos between your own To Do List and a remote To Do List.
These changes will appear for the other user if they are currently running SaleSmartz
or when they next start the application.
Sending To Do Memos
You can send To Do Memos to other users on the network. This could be to relay
ideas or simply to record phone messages taken for another person.
To send a To Do Memo, first open its memo window, then click on the "Send
To Do" ![]() button .
button .
The "Send To Do memo" window will then appear. You can select a recipient and then click "Send". Only those users that use the same "Shared resources" file are available to send memos to in this way i.e. all SaleSmartz users must use the same "Shared resources" file in a shared folder or server in a network.
Alternatively you can click on the button "Send to file...". When you click on this button you can choose the To Do file or message centre belonging to another user and click "Save". This file must be accessible in a shared disk in the network.
A message will be automatically appended to the To Do Memo to confirm that it has been sent. The receiver of the memo will automatically receive an appended message to say who sent the memo and when.
Message Centres
Message Centres can be used to collect message if you are away from the office or do not wish other users to see your To Do List file. It has the same functionality and format as a To Do List file but its main function is to receive memos.
If you place your Message Centre on a file server or other shared disk, users
can send messages to you and even check your schedule in this file.
As with your own To Do List file, you can set the access privileges in the Message
Centre with the "Access (Centre)..." menu item in the "To Do
(Msg Centre)" menu.
It is possible to have more than one Message Centre but only one is listed
as the default. Others can be opened with the "Open" menu item in
the "File" menu.
A preference can be set to automatically open your default Message Centre when
you first start SaleSmartz. This can be used as a quick check to see if you
have received messages while you weren't using your system.