General
About
Price Lists are the reference documents for all Products. The structure of
a Price List allows sharing a single file between many users, such as in a team
network situation. Updates made by a user will be shown in the Price List on
the other users computers (See chapter "Multi Users").
Links are formed from Price Lists to Catalogues and Quotes in order to obtain
Product information. Product information such as code, name and price are stored
in Price Lists. All references by other documents to Products in a Price List
are by product code only.
Product Groups are also stored in a Price List. Icons can be attached to both
Products and Product Groups. Icons can also be edited within the Price List
(See section "Product Icons").
Window
Price List window
The price type popup menu (which appears in the middle of the window under the title) allows you to show different price types e.g. Retail and Wholesale. This popup menu is only visible if there is more than one price type (See section "Price List", chapter "Preferences").
Creating
Select "New..." in the "File" menu and then choose the "Price List" document type in the "New document" dialogue.
Deleting
A Price List file can be deleted by removing its file from disk.
Opening
A Price List can be opened by opening the file on disk or from the "Show a Catalogue/Price List" menu in the "Windows" menu. It can also be opened from a Quote or Catalogue by selecting the menu item "Open reference documents" or when an object requests Price List information (such as double clicking on an object in a Catalogue).
Menu
The Price List has a main list window for viewing all Products, Icons and Product Groups. It has its own menu called "Price List". When the Price List window is active, this menu will appear and contains these items.
Price List menu
Show Products
Shows the view containing the list of Products.
Show Product Groups
This shows the Product Group view of the Price List window to show all installed groups and allow editing of them (See section "Product Groups" ).
Show Icons
This shows the Icon view of the Price List window to allow icon editing (See section "Product Icons").
Show Stock adjustments
The stock adjustments view of a price list can be show by selecting this menu item.
New delivery...
If you wish to use the stock level features of SaleSmartz, this menu item allows you to enter a new delivery into the price list to change the stock levels for the selected products.
Use default "Retail" price settings
This menu item changes the selected product(s) to the default price and sales tax settings. These settings are taken from the selected Product’s Product group or the Price List. This action only affects the currently shown price type (if you have more than one).
Set as default Catalogue/Price List
This will make this Price List the default, so it will be opened, optionally at startup, or from the Windows menu.
Set defaults...
You can set the Price List's defaults with this menu item.
Set defaults
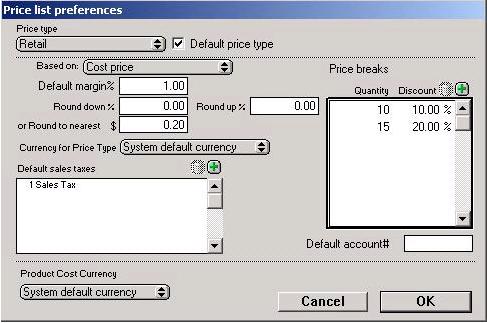
Setting the defaults for a Price List.
Price type
A popup menu at the top of the defaults window can be used to edit the defaults for each price type in the Price List, if there is more than one price type.
Default price type
The most commonly used price type can be marked with this check box. This price
type will be shown when the price list is first opened.
Note: The price type popup and checkbox will not be visible if you have only
one price type (See section "Price List", chapter "Preferences").
Based on
Here you can select if this price type is based on cost price, or another price type. Then the margin will set your sell price.
Default margin
The margin will be used for Products which use a default Price List margin (See section "Pricing", chapter "Product").
Round up/down
Rounding of prices can be determined in the two rounding fields. Products that use a margin to calculate their retail price will be affected by these fields. Rounding can be used to prevent retail values containing decimal or odd values.
Or to nearest
You can specify the minimum price rounding here. eg. round to the nearest $
Currency for price type
The currency for this price type can be set here. This will convert all prices in the price type using the exchange rates set in the Preferences (See section "Price List", chapter "Preferences").
Default sales taxes
Sales tax can also be defined in this window. The sales tax field in the
right of the dialogue is used to display all sales tax values used in this price
list.
The field in the bottom of the window is used to define which tax(es) will be
the default for the selected price type. Taxes can be added by first selecting
the Tax field and then choosing "New Sales tax" in the "Edit"
menu for Macintosh, or for Windows, by choosing "New Sales tax" in
the menu provided by clicking the right mouse button.
Clicking on each line will allow you to choose a tax from the applications list
of taxes stored in the "Shared Resources" file (See section "Price List" in chapter "Preferences").
Price breaks
You can specify price breaks that apply to the whole price list here. You can also set price breaks per product group and per product.
Default account
The account code is only used when exporting products to an accounting system.
Product Cost Currency
This poup menu defines the currency that is used when you purhcase your products. By default it is your own currecny, specified by "System default currency"
Product Icons
About
Picture icons can be added to a Price List to enhance the appearance and descriptions
of Products. These icons are stored in the Price List file and linked to Products
and Product groups.
Both large and small icons are used in SaleSmartz. Be sure to edit both the
large and small versions of an icon, as they are used in different views. Small
icons are usually used in lists, while large icons are used in Catalogues, Quotes
and Price Information Windows.
Creating
Icons can be added by using the "Icons" view of the Price List window.
Select the menu item "Edit icons..." in a Price List menu when viewing
any of the Price List windows. The "Icons" view will appear with a
list of all of the Icons in the current Price List.
To add a new icon, select the menu item "New icon" in the "Edit"
menu and the Edit Icon dialogue will appear with a new default icon. Edit the
new icon as described later (See Editing section). To add the new icon to the
list, click on the "Save" button. It will then be saved and included
in the list.
Icons can be pasted into a Product Information window or the into the Price
List window from the clipboard (See section "Product Info window", chapter "Product").
Disk file icons (Macintosh version only)
If you wish to copy an icon from a disk file for example, switch into the "Finder",
select the file, and show the information window for that file by selecting
"Get info..." in the "File" menu. Click on the file's icon
at the top left of this window and copy it. Switch back into the SaleSmartz
application and paste the icon into the Price List window.
Pictures
Pictures can be pasted as icons. If you have a graphics viewing application,
select a picture and copy it. Switch into the SaleSmartz application and paste
the picture into the price list window. A new Icon should be created using the
picture.
Icons can also be dragged from another Price List’s window.
Deleting
Icons can be deleted by selecting an icon in the Icon's view and selecting "Clear icon", "Cut icon" in the "Edit" menu or pressing the "Delete" key.
Editing
Icons can be edited within the Price List. Double click on an Icon in the List window, or select it and choose the menu item "Edit icon". You will be presented with this editing dialogue.
![]()
Icon editing dialogue
Both large (Product information window) and small (Products in the Price List
window) icon views can also be edited.
256 Cols, 16 Cols, B & W.
An Icon consists of four different view modes, the three colour depths and shadow. The mode(s) you choose to edit will depend on your computer’s screen colour capabilities, i.e. if you only work with a black and white screen then you will only need to edit the "B & W" icon view.
Shadow
The shadow mode is used to provide the background for the icon, it acts as
the screen. If you draw an icon and notice that not all the parts of the icon
are visible, then you will probably have to change the shadow mode icon.
A simple way to edit the shadow mode is to drag an icon from another mode on
to it for conversion.
Expert icon editing
If you have this option selected then you will be able to edit all possible view modes, as seen in the figure shown above. Normally you would have this option disabled and only edit the icons mode which matches your screen.
Making changes
1) To select an icon view, click on the sample icons at the top right of the window. Both large and small versions are available. Small versions will be used in line views, such as the Price List and Catalogue/Quote contents. Large Icons are used in Graphic views, such as the Catalogue and Product Information window. When selected, the chosen view will appear in the large editing field on the left.
2) Choose the tool you wish to use to draw from the tool palette.
3) Choose a colour from the palette on the bottom right of the window.
4) Use the cursor as a pencil to fill in dots of the Icon with the chosen colour. Straight lines can be drawn by first holding the shift-key down and then clicking in the sample. The first direction you move the cursor in will be the direction of the line you draw.
5) Borrowing a colour from a part of the sample icon can be done by holding the "Alt" (Mac)/"Ctrl" (PC) key down or choosing the eye dropper tool. The cursor will change to an eye-dropper symbol . The tip of the eye-dropper picks up colours when clicked on a dot in the sample. The selected colour will then appear in the colour palette.
6) Icons can be dragged to other icons in the top right of the window to convert them to different modes and sizes, e.g. the large 256 colour icon can be dragged onto the small 256 colour icon to convert the image to a small size without having to redraw it.
7) When editing is completed, click on the "Save" button at the bottom of the dialogue to store the changes into the Price List file.
Product Groups
About
Product Groups provide a means of collecting Products into groups. A Group
has a name and optionally an icon. The group's icon will be used by Products
in the group if a Product has no icon of its own. "<None>" will
be shown as the default group name for Products. Even "<None>"
can have an icon attached.
A Product Group can also have a sell price margin assigned to it. This margin
will be used if a Product in this group uses the "Default margin"
mode (See section "Pricing", chapter "Product").
Product Groups.
Creating
Groups are created when Products are imported from a file and the "Product
Group" column has been checked "on" (see chapter 17. "Importing
Data").
They can also be added by using the "Product Groups" view of the "Price
List" window. Select "Show Product Groups" in a price list menu
when viewing any of the Price List windows. The "Product Groups" view
will appear with a list of all of the Product Groups in the current Price List.
To add a new Product Group, select "New Product Group" in the "Edit"
menu and the Edit Product Group dialogue will appear with a new default group.
Edit the new group as described later (See section "Editing" below).
To add this new group to the list, click on the "Save" button. It
will then be saved and included in the list.
Deleting
Product Groups can be deleted by selecting a group in the "Product Groups" view of the "Price List" window and selecting the menu item "Clear Product Group" or pressing the "Delete" key. The default group "<None>" is protected and can not be deleted.
Editing
Product Groups can be changed if desired. Double click on a group in the Product Groups view or select and select "Edit Product Group" in the "Edit" menu. You will be presented with this dialogue.
Edit Product Group dialogue
Icon
An Icon can be linked to a Product group by pasting from the clipboard or selecting
from the Icon list, in the same way as in the Product Information window.
Select the icon in the "Edit Product Group" window, and paste a new
icon. Double click on the icon to choose from the list of icons in the Price
List.
Group name
The name of the group can be edited in the "Group name " field.
Note: The "<None>" group name cannot be changed.
Price type
This popup menu allows you to define the following defaults for each of the
price types.
Note: The Price type popup menu will not be visible if you only have one price
type (See section "Price List" in chapter "Preferences").
Group Margin
If you wish, a group's sell price margin can be set in this field. Click the button "Group margin" and then type a value into the field. This value will be used for Products in this group using the "Default margin" mode (See section "Pricing", chapter "Product").
Group account #
A default account code can be set for products groups. This account code will be used when exporting products to an accounting application. This account code will only apply to products without their own account code.
Sales tax
If you wish to assign a sales tax to all products in this product group, use
this field.
Taxes can be added by first selecting the Tax field and then choosing "New
Sales tax" in the "Edit" menu for Macintosh, or for Windows,
by choosing "New Sales tax" in the menu provided by clicking the right
mouse button. Only sales taxes listed in the Preferences can be used (See section "Price List",chapter "Preferences").
Stock adjustments
About
Product stock adjustments is an optional feature of Price Lists that can be
used to keep control of stock levels.
The Stock adjustments view can be shown by selecting "Show Stock adjustments"
in the "Price list" menu.

Price List stock adjustments
Stock adjustments are stored in each Product, and can be edited in the Product
Info window (See section "Supply", chapter "Product").
If you wish to use this feature, you can mark a preference in the "Invoice"
section of the Preferences to automatically change stock levels to account for
products used in Invoices. These changes will be made when you mark an Invoice/Order
confirmation as "Sent".
Importing
About
The easiest way to build or update a Price List is to import data from another
file. Selecting the "Import..." menu item in the "File"
menu presents you with the import dialogue.
Importing of Products and Contacts is described in the chapter "Importing Data".