General
About
When users are connected to a network they automatically receive updates and
make changes to files they open from a central server.
If a user travels away from the main network (e.g. a salesperson visiting clients),
they will have to take any required files with them. For example these files
could be price lists and the contacts that he/she will visit.
If any changes are made to files while the user is away from the network, then
these changes will have to be transferred back to the main server at a later
stage.
The file synchronization section of SaleSmartz allows the transfer of changes
(in both directions) between files that originated from the same source file.
For example, if a Salesperson visiting a client makes a quote for the client,
while at the same time a person in the main office adds a contact memo to the
server's copy of the same client file, then the two copies of the client file
need to be synchronised.
Note: If you take files from a server and you intend to synchronise them at a later date, it is recommended that you perform an initial synchronization after they are copied to your own computer. This prepares files and so they "remember" the current state of the server files and helps to resolve changes better later.
Leaving the office/ Back in the office/ Update remotely with office
These menu options are used to simplify disconnecting and reconnecting to a network of computers.
Leaving the office
This option copies any files that you may need from the file server to your own computer so you can view and change them while you are away from the network.
Back in the office
This option will update the server files with the files you have changed while you are away from the network. Changes are updated both ways.
Update remotely
This option can allow you to update files while you are away from the network.
Advanced
The advanced option allows you to manually synchronise files
Direct synchronization
The simplest form of file synchronization is "Direct synchronization". This allows a user to choose two files and synchronise them together automatically.

"Direct " file synchronization
The process of "Direct synchronization" is described here:
1) Open the local file you wish to synchronise, e.g. a contact file. This step can be skipped if you wish to choose the file after you open the "File synchronization" window.
2) Select "Synchronise" in the "File" menu.
3) The local file is already placed in the fields representing the local file in the "File synchronization" window. If you wish to choose another local file, click on the "Choose file" button beside the "Local file" label.
4) If the local file has been synchronised with a remote file before, then
this remote file will be shown in the fields in the right of the window. If
no remote file is shown or you wish to change it then click on the "Choose
file" button beside the "Remote file" button. Generally the remote
file will be the file on the file server.
If you wish to use TCP synchronization, click on the "TCP" button.
TCP synchronization is described later in this chapter.
5) Click on the "Synchronise" button. The process of synchronization will be started and you will see a description of each action as the file is synchronised.
Unresolved actions
In some cases, an object may be changed in both the remote and local files. For example if a quote was updated in the office, while a salesperson updated the same quote in the field. When this happens a dialogue will appear to explain the situation and allow you to make the appropriate correction.
"Unresolved synchronization actions" dialogue.
Auto synchronization
Auto synchronization allows you to synchronise groups of several files with remote files. For example if a salesperson travelled out of the office often, then they could keep a folder on their own hard disk containing the server's files they use, ready for auto synchronization. When they return to the office, they can use auto synchronization to update both their own, and the server's files.
"Auto" file synchronization
The process of auto file synchronization is similar to direct file synchronization:
1) Each group of synchronised files is contained in a folder within the folder
"Synchronization". The "Synchronization" is placed inside
the main SaleSmartz folder. If this folder is not already there, a button called
"Create" will appear in the top of the window. Clicking on this button
will create the folder "Synchronization" and allow you to drag folders
with files into the folder.
You may have many different folders for auto synchronization, each of which
can represent a different network or location.
2) Once a folder is selected in the Auto synchronization panel, you can select
the remote folder to synchronise files with. This remote folder would normally
be on a file server, and contain copies of all of the files you wish to synchronise.
You can also choose TCP or Modem as the synchronization method, see the section
later in this chapter.
3) Click on the "Synchronise" button and the process will be started. A record of actions will be shown, as in the "Direct synchronization" section.
Modem synchronization
You can use a modem to link two computers and synchronise via a phone line.
Modem synchronization requires that a machine running SaleSmartz acts as a remote
server, generally in the office network. Clicking on the "Start server"
button in the "Server" section of the advanced "File synchronization"
window starts the Modem server.
Modem setup panel
Once you have started the server, a user can connect remotely by entering the
number to the server in the phone number field, changing the other settings
to match those of the server and then clicking on the "Connect" button.
The remote computer will then connect and synchronise files with the server.
TCP synchronization
SaleSmartz allows users to synchronise files using TCP. This will generally
be using Internet, although other networks such as Localtalk and Ethernet can
be used.
Note: Some Windows computers may not support SaleSmartz TCP synchronization,
please contact EuroSmartz customer services for more information.
TCP synchronization allows users who are travelling, to connect to the main
server in an office and synchronise files in much the same way as when they
are connected to the office network.
TCP synchronization requires that a machine running SaleSmartz acts as a remote server, generally in the office network. Clicking on the "Start server" button in the "Server" section of the advanced "File synchronization" window starts the TCP server.
Both Direct and Auto synchronization have an option for TCP. To choose this option click on the "TCP" button in the right of the window. The TCP address fields will be shown.

TCP address panel
You can fill in either the text, or the dot address of the remote server.
When a SaleSmartz TCP server is started, it will show its dot address and, if
available its text address in the "Server" panel.
Note: On some internet connections, both the server dot and text address change
each time the computer connects to internet. Please contact your internet provider
for more information. If the address changes for each connection, the person
connecting to the server will have to be told the current server address, shown
in the "server" panel.
This is the process for TCP synchronization:
Server
1) Connect the server computer (usually in the office) to the TCP network (e.g. for internet, you could use SLIP or PPP).
2) Open the "File synchronization" window, click on the server icon
to the left of the window. Click "Start server" to start the SaleSmartz
server.
Note: Although the synchronization process is automatic, a user should be near
the server, to answer possible queries from the remote users computer e.g. if
the server can't find a file.
Remote user
3) The remote user also connects to the TCP network in the same way as the server.
4) Choose Direct or Auto synchronization in the same way as for a normal direct file synchronization. Click on the "TCP" button to show the TCP address fields.
5) Type in the server's text or dot address (contacting the user running the
server to get the address if necessary), and click "Synchronise".
Both the server and the remote computer will disconnect from TCP when finished.
The connection to Internet or other network will not be affected, you will have
to disconnect this link yourself.
Palm Sync
About
Palm synchronization is an add-in module which provides synchronization between
SaleSmartz Contacts/Date Events, and a Palm Pilot database.
This synchronization is a Full 2 way synchronization and updates/adds/deletes records 2 ways, with
confirmation if required.
You will need to download and install the SaleSmartz Palm Conduit
Installation
Windows
1) Download and run the SaleSmartz Conduit Installer for Windows here: v5.0 or v4.3.
This will install the Palm conduit "SaleSmartz Conduit.dll" in your Palm directory.
If you have any problems, make sure you have downloaded and installed the latest Palm Desktop software here
Macintosh
1) Download the SaleSmartz Conduit for Macintosh: v5.0, v4.3 or v4.3 Classic
2) Unstuff the downloaded file, and place the "SaleSmartz Conduit" file in your
"Conduits" folder inside your Palm application folder.
For OS8-9, the conduits folder is in your Palm application folder, eg. Macintosh HD/Palm/Conduits
For OSX, the conduits folder is generally in /Library/Application Support/Palm HotSync/Conduits
3) Use the Palm software "HotSync Manager" to set up the SaleSmartz Conduit
Synchronization
The SaleSmartz conduit synchronizes like the other standard conduits, except
you will need to have SaleSmartz running and in Sync server mode.
Make sure you have set the Palm preferences in the menu Windows - Preferences.
Note: If a record has changed on both the SaleSmartz and the Palm database, then a
duplicate will be made on each database. This does not relate to non Palm items such as Quotes etc.
It is recommended that you back up both your Palm and SaleSmartz before your initial synchronization.
1) Start SaleSmartz, choose menu "File" - "Synchronization" - "Advanced"
2) Click on the "Server" tab and click "Start Server"
3) Press the sync button on your Palm Pilot to start the synchronization.
You should see the connection being made to the synchronization server, and the events being logged.
Contacts
The SaleSmartz Conduit will synchronize Contacts and their fields with the Palm database.
As there can be several addresses per SaleSmartz contact, these will be split
to fit on the Palm, and reassembled back to SaleSmartz for updates.
Each category on the Palm relates to a Contact group in SaleSmartz.
If there are no contact group files matching the Categories on the Palm, new ones will be made.
This section will be enhanced so that specific Contacts can be "tagged" inside a larger group so that you can specify the records to be synchronized with a custom variable.
Date Events
The SaleSmartz Conduit will synchronize Date Dependant To Dos with the Palm database.
You can choose to synchronize Auto To Dos (blue) with the Menu Window - Preferences - Palm preferences.
iCal Sync
About
The iCal sync module in SaleSmartz will allow you to share your Calendar events with the OS X iCal application. You can either use the SaleSmartz iCal server to publish your Calendar, or use the export file format to save your SaleSmartz Calendar to a file for importing into iCal.
iCal Server
The SaleSmartz iCal server will allow you to publish the SaleSmartz Calendar for your iCal application.
This can allow a PC or Mac OS X user to publish their SaleSmartz Calendar and access it over the internet, or simply on the same OS X computer.
To activate the server, select the "File" menu - "Synchronization" - "iCal synchronization".
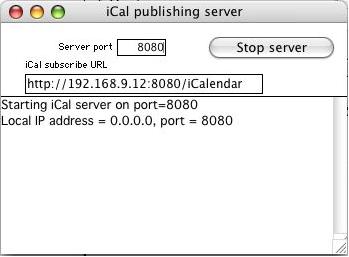
iCal synchronization server window
You may have to change the port number if your computer is already using the port for another process and you receive an error.
You could try a number greater than 10000 to have a better chance of not conflicting. Check with your network administrator for more info.
Click on the "Start server" button and you will see the status in the log field below. You will see any errors there.
Once successfully started, the iCal URL field will be displayed. You can copy this URL and use it in your iCal application. Check with the documentation in iCal to see how you can subscribe to an iCal server.
iCal export file
You can export your Calendar to an iCal export file.
When viewing a To Do window, (Monthly, Daily, Single To Do etc.) you can select from the menu "File" - "Export To Do" - "iCal".
You will then be asked to save the file and it will then be exported.
Check with yout iCal documentation to see how to import this file.