General
About
A Label Template can be used to design and print labels on self adhesive label
sheets. A Label Template consists of two viewing modes, one to design the layout
of the label and page, and the other to show the list of text to be printed.
Envelopes can also be printed using Label templates. You can treat an envelope
as a single label, setting the "Labels across" and "Labels down"
fields to 1.
Switching between the two viewing modes is done by clicking on one of the two
buttons to the top left of the Label Template window.
Each label can contain one or more fields. These fields are defined in the layout
mode. Labels can be created manually by typing in text, or by dragging or merging
a Contact to the Label
Template
You can also print standard labels that have fixed text (no Contact fields) e.g. Disk labels.
Creating
To create a new Label Template, select "New" from the "File" menu and then choose the "Label Template" document type.
Opening
A Label Template can be opened by either opening the file on disk or merging Contacts with a Label Template stored in the "Merge templates" folder (See chapter 21. "Mail merging"). Label Templates placed in the "Merge templates" folder will be visible in the "Merge with..." menu item in the "File" menu when a Contact is selected.
Layout mode
About
Once opened, a Label Template can be edited. As mentioned earlier, a Label Template consists of two viewing modes. The Layout mode is used to define the printed appearance of each label. Each label can contain text or pictures, such as logos etc.

Label Template window, layout mode
Mode buttons
The two buttons to the upper left of the window allow you to switch between the two modes.
Labels across/Labels down
After you have chosen a sheet of labels to use, you can set the dimensions of this sheet in the fields at the top of the template window. The number of labels used, across and down can be entered into the fields of the same names.
Top margin/Left margin
These fields will define the distance between the top left corner of a sheet
of labels and the top left corner of the first label. The actual measurement
may vary depending on the printer you are using.
Note: Most printers will not print right to the very edge of a sheet of paper.
If you have problems with a the edge labels being truncated, adjust the template
layout blocks or set the left/top margins to start on the next label down/across
so as to avoid using the edge labels.
Label width/Label height
These two fields define the dimension of each label. This dimension should actually be the distance from the left/top of a label to the left/top of the next label. This will account for any gaps between labels on the sheet.
Editing
The layout of each label is defined in the lower section of the layout mode.
The size of this area represents a single label, defined by the width and height
fields mentioned above.
Click on the label layout area, then choose "New template block" in
the "Edit" menu to create a new block. Double click on a block to
edit the content of it. The editing of template blocks is mentioned in detail
in chapter 10. "Print Template", sections "Text block" and
"Picture block".
Each field placed on the layout defined as "Preset" text (shown with
«» characters around the text content), will appear as a field in
the labels mode.
Labels mode
About
The labels mode of a Label template contains the text used as the content of
the printed labels.
The two buttons in the upper left of the window will switch between the two
modes of the Label Template.
Reuse labels
The grid at the top of the window is used to reuse label sheets. If you have
already printed a few labels on a sheet, you can print more labels on the same
sheet later by marking the labels which you have used.
Click on the grid in the places where labels have been used/removed and these
positions will not be used when printing new labels. A grey rectangle indicates
that a position will not be used. All of the labels will still be printed, but
shifted down to account for the label stickers already used.
Click on the button to re-select all labels for printing.
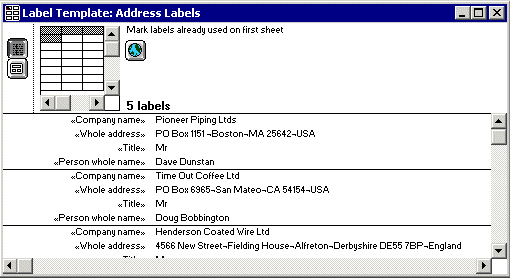
Label Template, labels mode
As mentioned in the layout mode section, label field names are defined in the
layout. The template blocks which are defined as "Preset" text, will
appear here in the labels mode.
If you want to print identical labels (no Contact fields) then the text "no
template blocks in layout" will appear instead of field names.
Creating
Labels can be created by:
1) selecting "New label" in the "Edit" menu. A new empty label will be created and selected. You can click and edit label text fields to the right of each field heading.
2) dragging a Contact from another window, e.g. from the Contact List window, from the Contact file window or from a Hot Link in a To Do Memo.
Deleting
Labels can be deleted by selecting one or more labels and typing "delete" or by selecting "Clear label" in the "Edit" menu.
Editing
The content of each field within a label can be changed by clicking on the
field text area, to the right of the field name. Click once to highlight the
field, and then again to edit the text. Multiple lines of text can be entered
into each field, but be sure to allow for the height of these extra lines in
the template block in the layout mode.
When you have finished editing a field, type tab, type enter or click elsewhere
in the window to store the new text into the label's field.
Printing
About
Once completed, a Label Template can be printed by selecting "Print..."
or "Print preview..." in the "File" menu. Selecting "Print
preview" will show a preview window so you can see how the printed result
will appear on paper.
If some labels are truncated in the preview or on paper, then adjust the margins
to skip the labels which are not printed completely.